What Can Be Used for Warped Canvas Art to Make Flush Against Wall
If you lot crave a detail size or a type of canvas that is not available as a set up-made y'all may wish to make a custom sheet. Because the bars and sheet are usually more heavyweight, the quality will be improve than you can get in almost prepare-made canvases. Jackson's offers a reasonably priced bespoke canvass stretching service or you can stretch your own canvas.

Contents:
- Practise you need to make a custom sheet?
- Summary of method and time it takes for each stride
- The characteristics to consider when planning your stretched sail</a
- The tools required for stretching a canvas are straightforward
- Choosing the stretcher bars for the frame
- Choosing the canvas
- The amount of canvass
- Assembling the stretcher frame
- Stretching the canvass
- Folding the corners of a stretched canvas
- Troubleshooting
- Priming the canvas
- A canvas merely as you wanted information technology
- Sail on a panel
- Artist Canvas at Jackson's Fine art
Practise yous need to make a custom canvas?
The first time you might consider getting or making a custom sail is when you can't discover the size you want. We stock set-made canvases in a wide range of sizes in 10cm or ii-inch increments starting at 7x10cm and going up to 120x160cm and 100x180cm. Jackson's Premium Cotton Canvases also come in special Gilded Ratio sizes (*see the note at the end) as well as the standard ratios. But non every size imaginable is available. If you need an unusual proportion (long and narrow for case), a size between those available, or if you wish a particular canvas fabric or heavier stretcher bars that are not available in a gear up-made, yous tin can order a bespoke sheet made for you. This is washed at a off-white toll by skilled specialists in our Bespoke Sail Department. Simply you lot tin save money by stretching your canvas yourself, using the same bars and canvas as they do in our Bespoke Sheet Department. You can go 39 50x60cm standard depth canvases or 6 150x200cm deep profile canvases out of a 210cm wide full 10m roll of canvas, including wrapping the canvas around to the dorsum and trimming off the excess you lot use to grip and pull. The more y'all do it, the better and faster you volition get. Information technology's a great mode to spend the coldest days of the year besides – many artists set bated a few weeks in the depths of winter for preparing surfaces, as you get a little workout and it helps to keep you warm.
Summary of method and fourth dimension it takes for each step
i. Knock together stretcher bars with a mallet – up to five minutes for a modest sheet, up to 20 minutes for a very large one with ii cross bars to fit in (some time is saved if you accept a helper for the large ones and you might demand a stepstool).
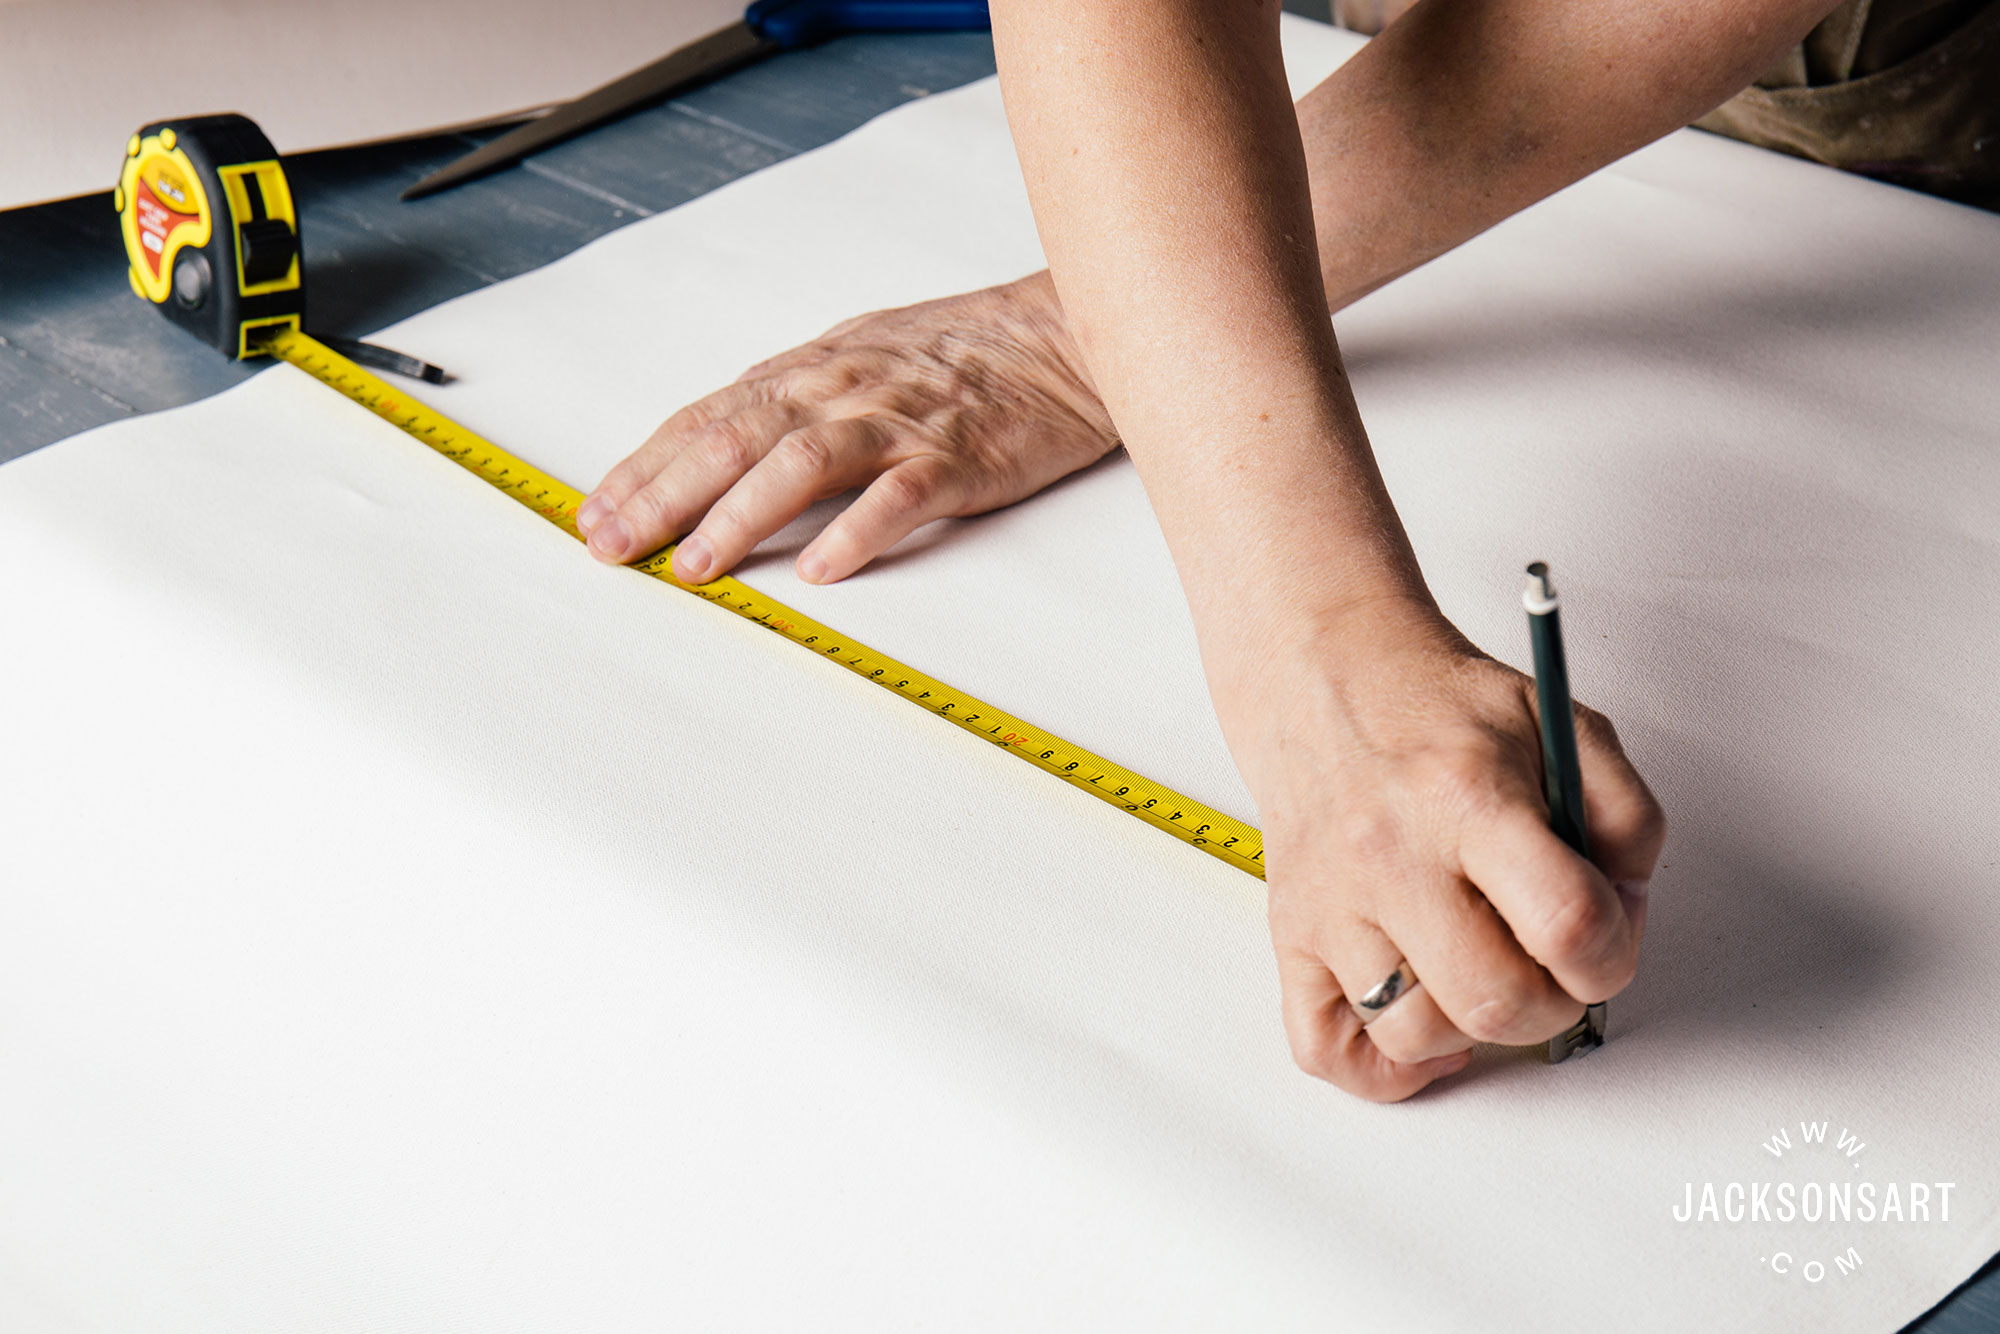
2. Practice the calculation, measure out, marker and cutting canvas piece with large shears – less than five minutes per sail, fifty-fifty faster when yous accept lots the same size.
3. Lay stretcher bar frame on canvas piece and square it upwards – less than 5 minutes for a small canvas, up to 5 minutes for big canvases.
4. Stretch canvas, including neatly folded corners – upwardly to 10 minutes for a small canvass, upward to 30 minutes for a large 1.
Total fourth dimension: less than 30 minutes for a small canvas and upward to an 60 minutes for a large one.
Part of the difference is that a modest one is on a table and you can stay in identify and turn the canvas. But a very big canvas needs to be on the flooring or a very large work tabular array and y'all have to move around it.
The characteristics to consider when planning your stretched sail
- dimensions (you may want a very specific size or unusual aspect ratio)
- depth of sheet (the thickness, how far it projects from the wall)
- the quality of stretcher bar (Professional wooden, Museum wooden, Museo Alu-Pro wood and aluminium)
- if you cull to add a centre bar or cantankerous confined for extra strength
- the type of canvas (cotton, jute, linen)
- the weight of canvas (in grams per square metre – gsm, or ounces per one thousand – oz)
- the brand of canvass (Artfix (French linen), Claessens (Belgian linen), Belle Arti (Italian linen and cotton fiber), Jackson's (Indian cotton)
- the orientation of the sheet – do yous plan to utilise it horizontally (landscape) or vertically (portrait) – this will affect how yous fold the corners
- the priming (un-primed, universal primed, oil primed, gum sized), later on it is stretched if you wish to you can prime number it with a primer with the characteristics you require, either on un-primed canvas or by calculation another coat of the primer of your choice to a universal primed canvas. Watercolourists can add a coat or ii of an absorbent ground and pastel painters can add together a layer of pastel ground.
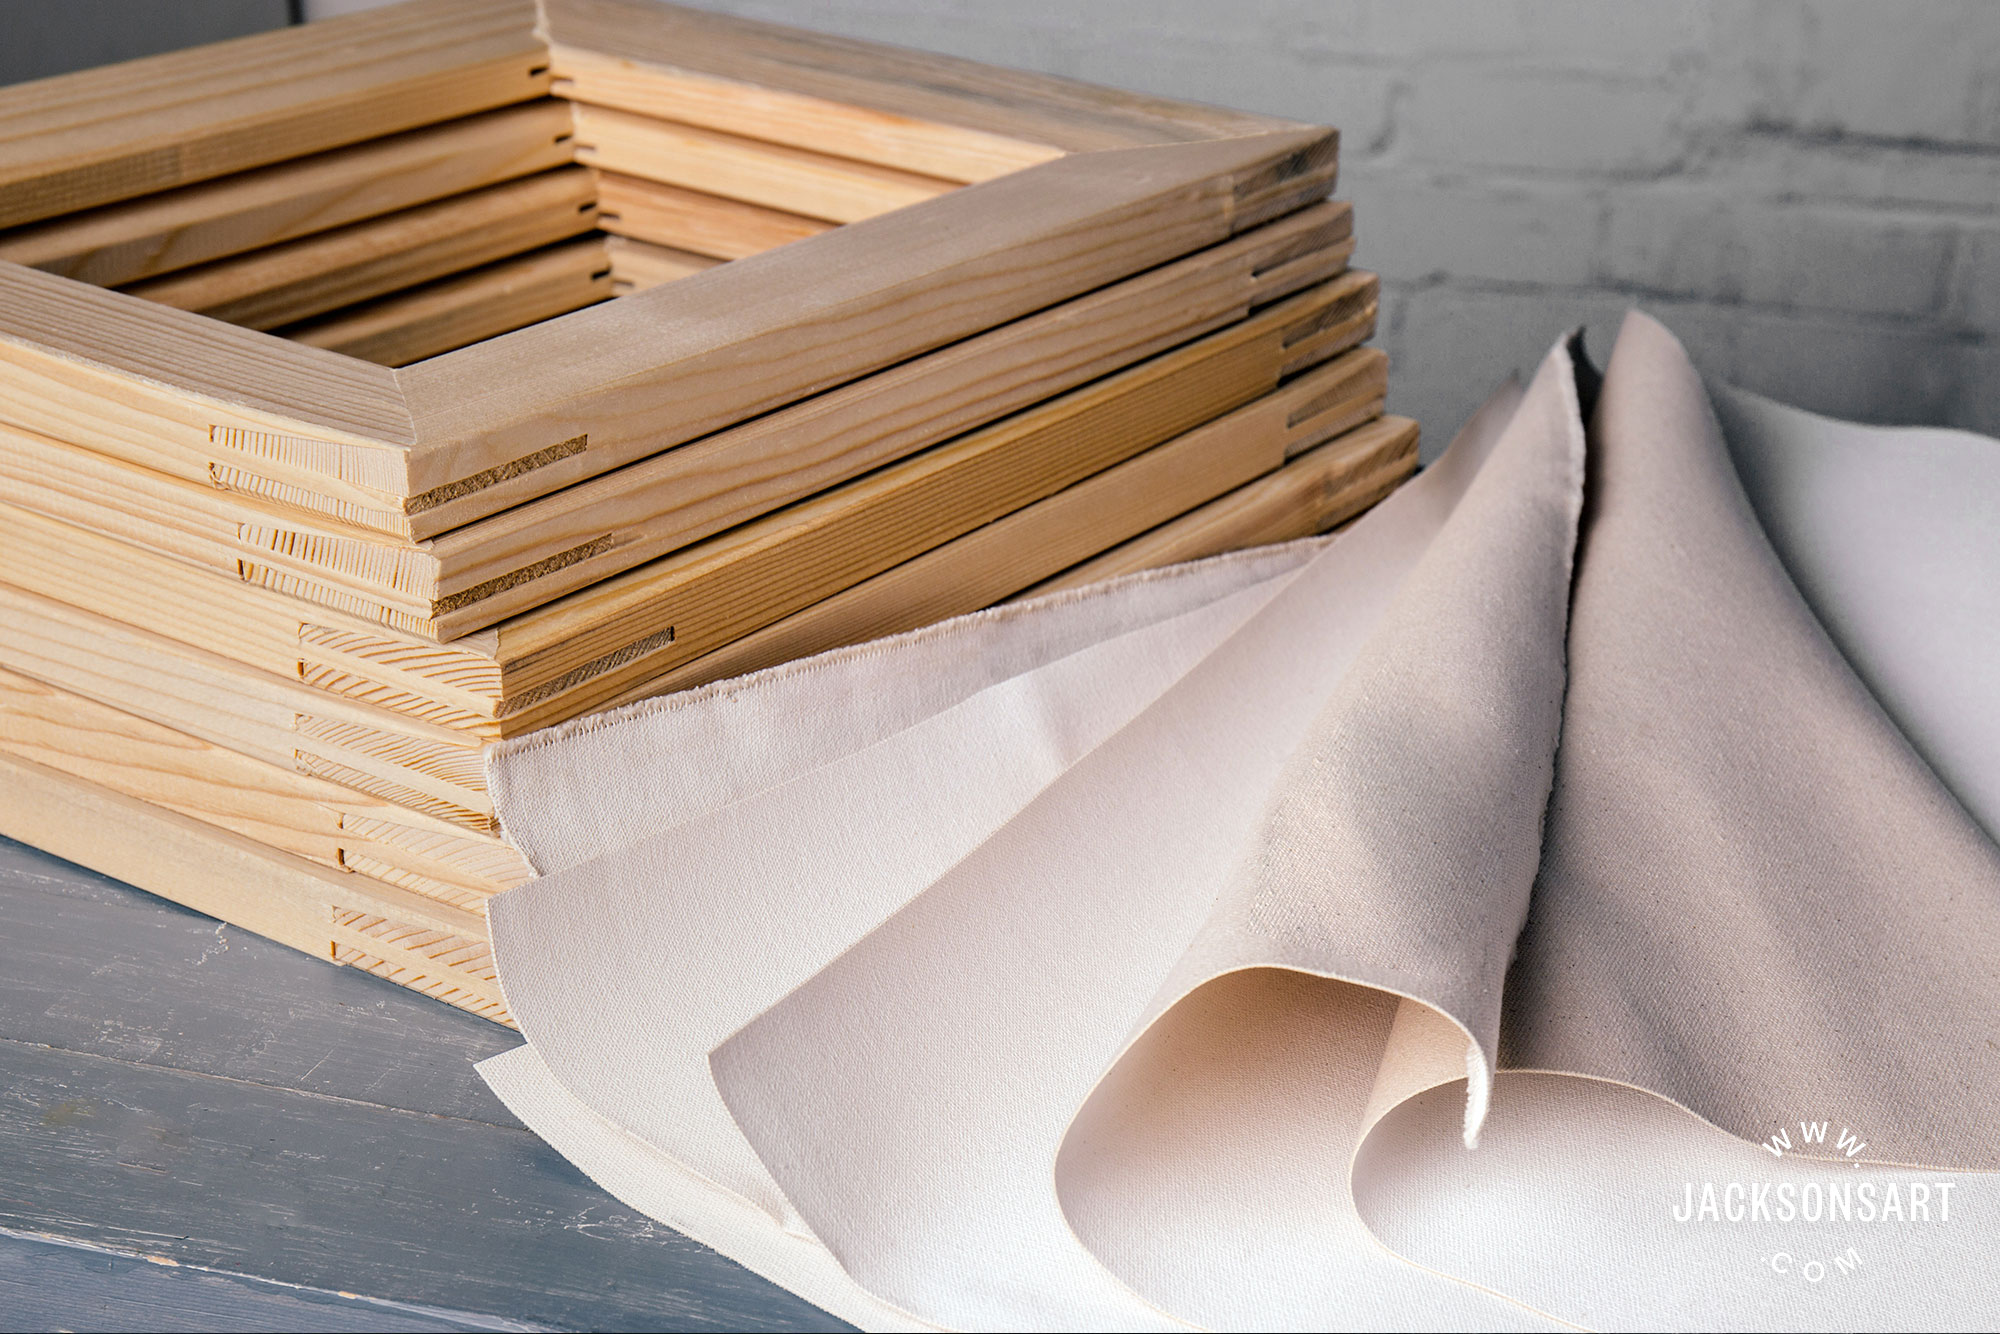
Choosing the stretcher confined for the frame
Our stretcher bars:
1. Quality – Professional wooden (stiff), Museum wooden (stronger because of the layers of laminated woods), Museo Alu-Pro wood and aluminium (strongest because of the aluminium, and information technology still has a scrap of woods to staple the canvas to).
2. Depth – we have 7 depths to cull from: 18mm, 21mm or 43mm (Professional wooden), 20mm or 35mm (Museum wooden), 25mm or 45mm (Museo Alu-Pro forest and aluminium). This is how far the painting will extend from the wall.
3. Size – yous may wish a standard aspect ratio like iii:four (120x160cm) or 4:5 (120x150cm) or y'all may wish to choose a ratio based on the Golden Ratio 1:ane.618 (120x194cm) or whatever other size that fits your discipline matter or idea best. All of the seven depths of stretcher bar nosotros do are in metric measurements except the 18mm and 21mm which are in inch lengths. For very large sizes you will need to choose thicker bars for forcefulness, and so the thinner bars aren't available in the largest sizes. Jackson's tin cut all three types of stretcher bar to bespoke lengths – this needs to be done past phone. The price is the cost of the bar that is one size larger on our price listing as yours will be cut downward from that – plus £ten per stretcher frame for the four new corner dovetail joiners.
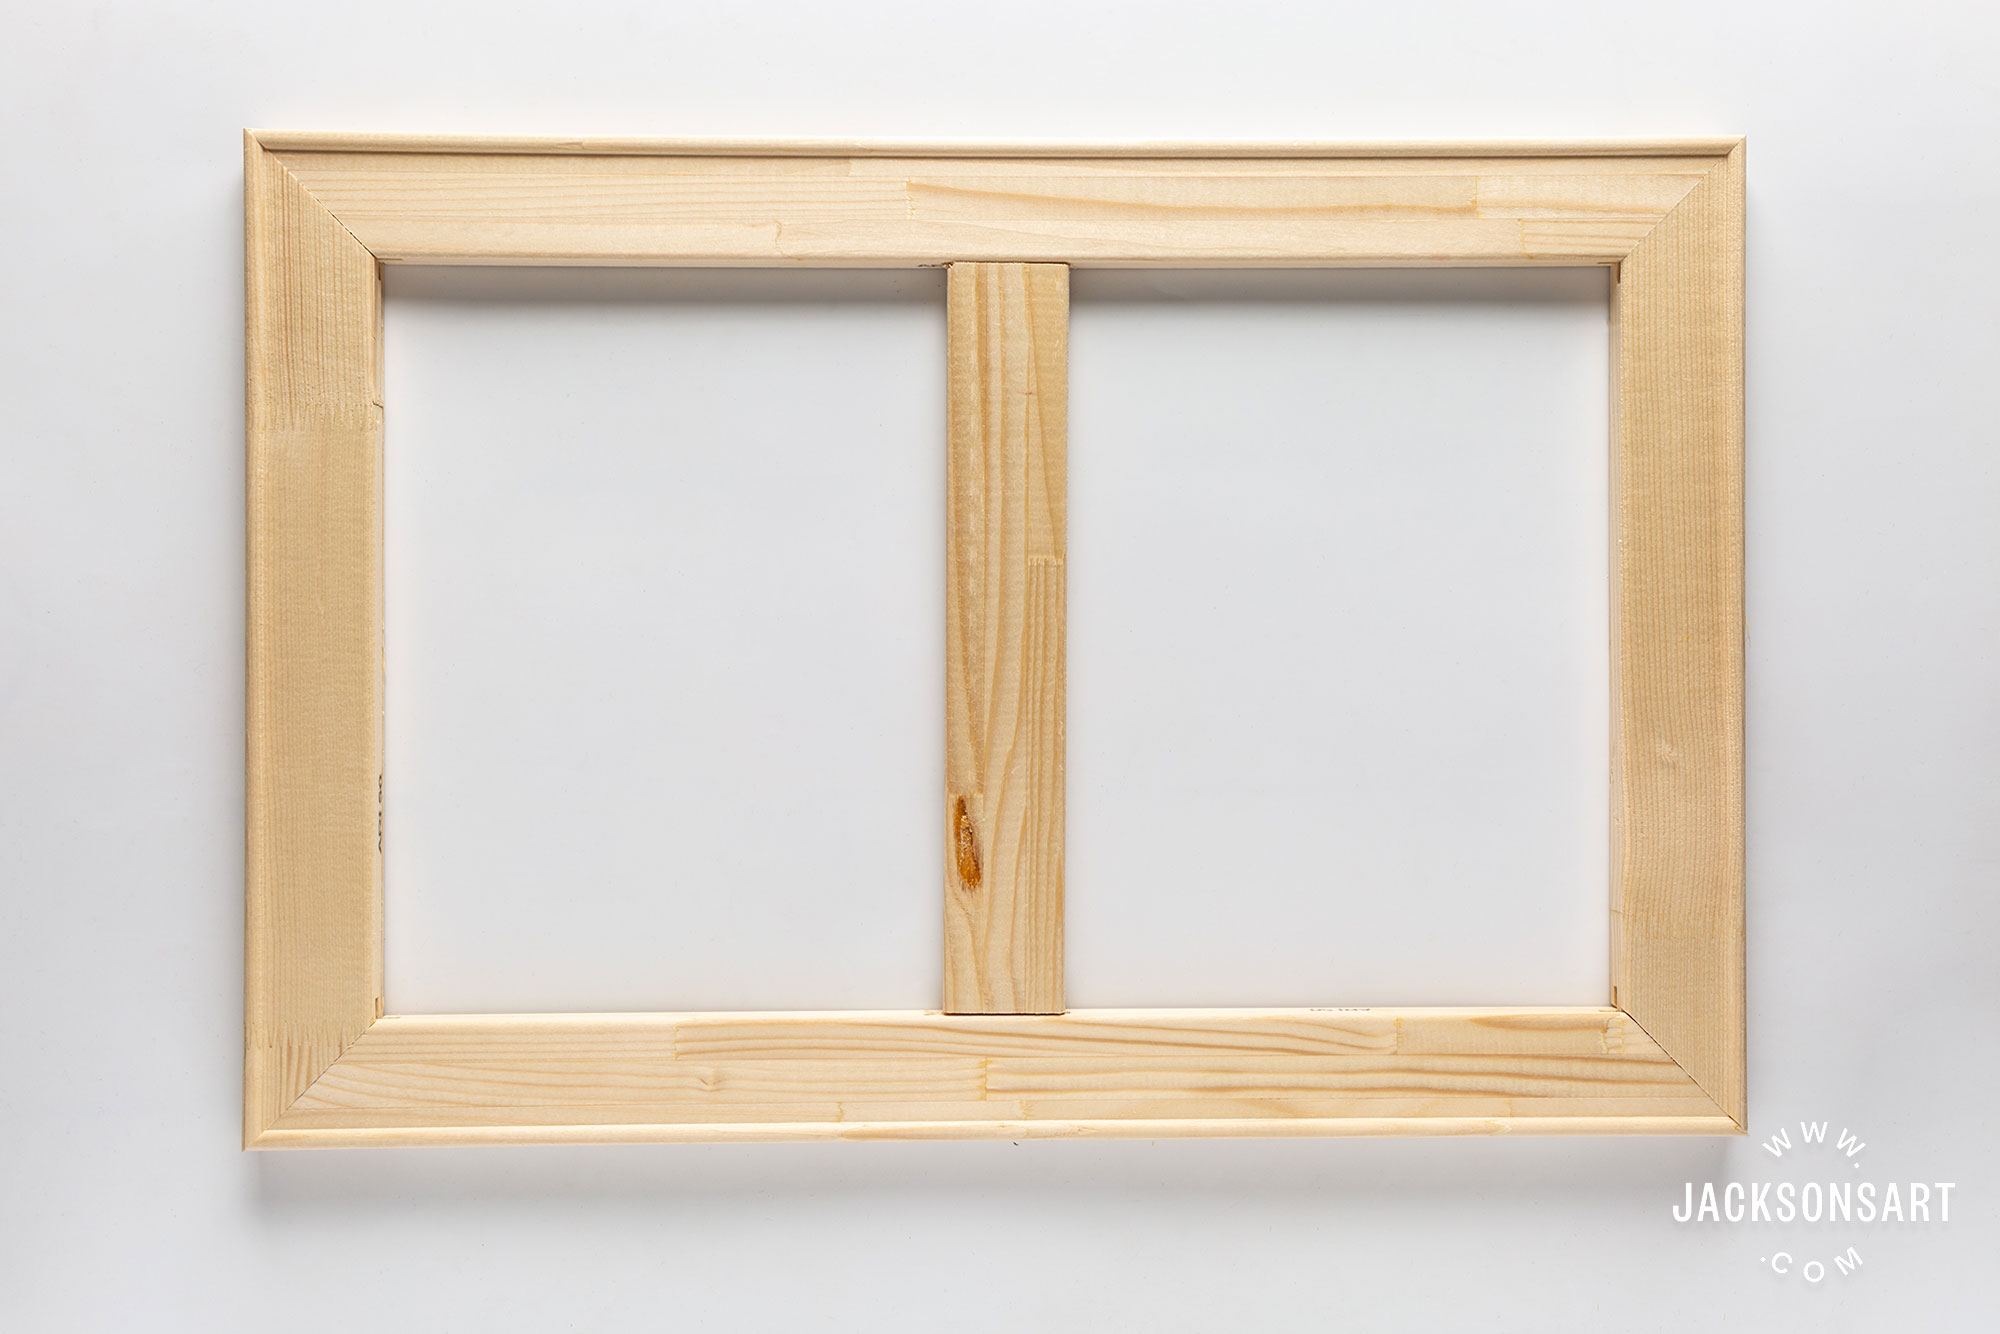
4. Centre bars – Decide if you desire a centre bar or cantankerous bars for extra bracing. Stretching canvas puts a lot of tension on the confined and can pull them out of flat and requite y'all a warped sheet (so that one corner is kicked away from the wall, a warped sheet will stone if laid flat, information technology will not have all four corners on the floor at the same time). Framers have told me non to rely on framing to flatten a warped sheet because the frame is non strong enough and will probably exist pulled apart under the pressure. Bracing on the back gives added rigidity likewise equally handy handles for conveying a large painting. Making sure the tension is fifty-fifty when stretching the sheet volition likewise be important to prevent the twisting of your confined. The two thinner confined in the Professional person range only allow one eye bar while the 43mm bars have two slots for eye confined to pass one over the other, so you can accept cantankerous bars. The Museum bars have cross confined with a notch in the centre for the bars to sit down flush like a lap joint. The Museo Alu-Pro center bars are all aluminium and need to be affixed with special hardware, they come in master and secondary sections depending on if you need just a single centre bar or a second cross bar.
When using a single eye bar the most stable construction is to have the centre bar going across the width, not the length – so the centre bar should be the aforementioned length as the shorter side of the stretcher frame. Simply in case y'all were wondering – you do not need to practice any maths when ordering centre bars, they may be smaller to fit inside the frame, just they are labelled for the side bar they demand to lucifer, then merely order the same size center bar as your shorter stretcher bar.
Some artists gum the corners of their stretcher bars simply and then if humidity changes the tension of your bars or canvass and you lot become a corner sag if y'all've glued it you cannot utilize the corner wedges (keys) to spread the frame a millimetre or two to get even tension again. You desire the stretcher frame to stay adjustable.
Read more in our sail blog article – Everything You Need to Know About Stretcher Confined.
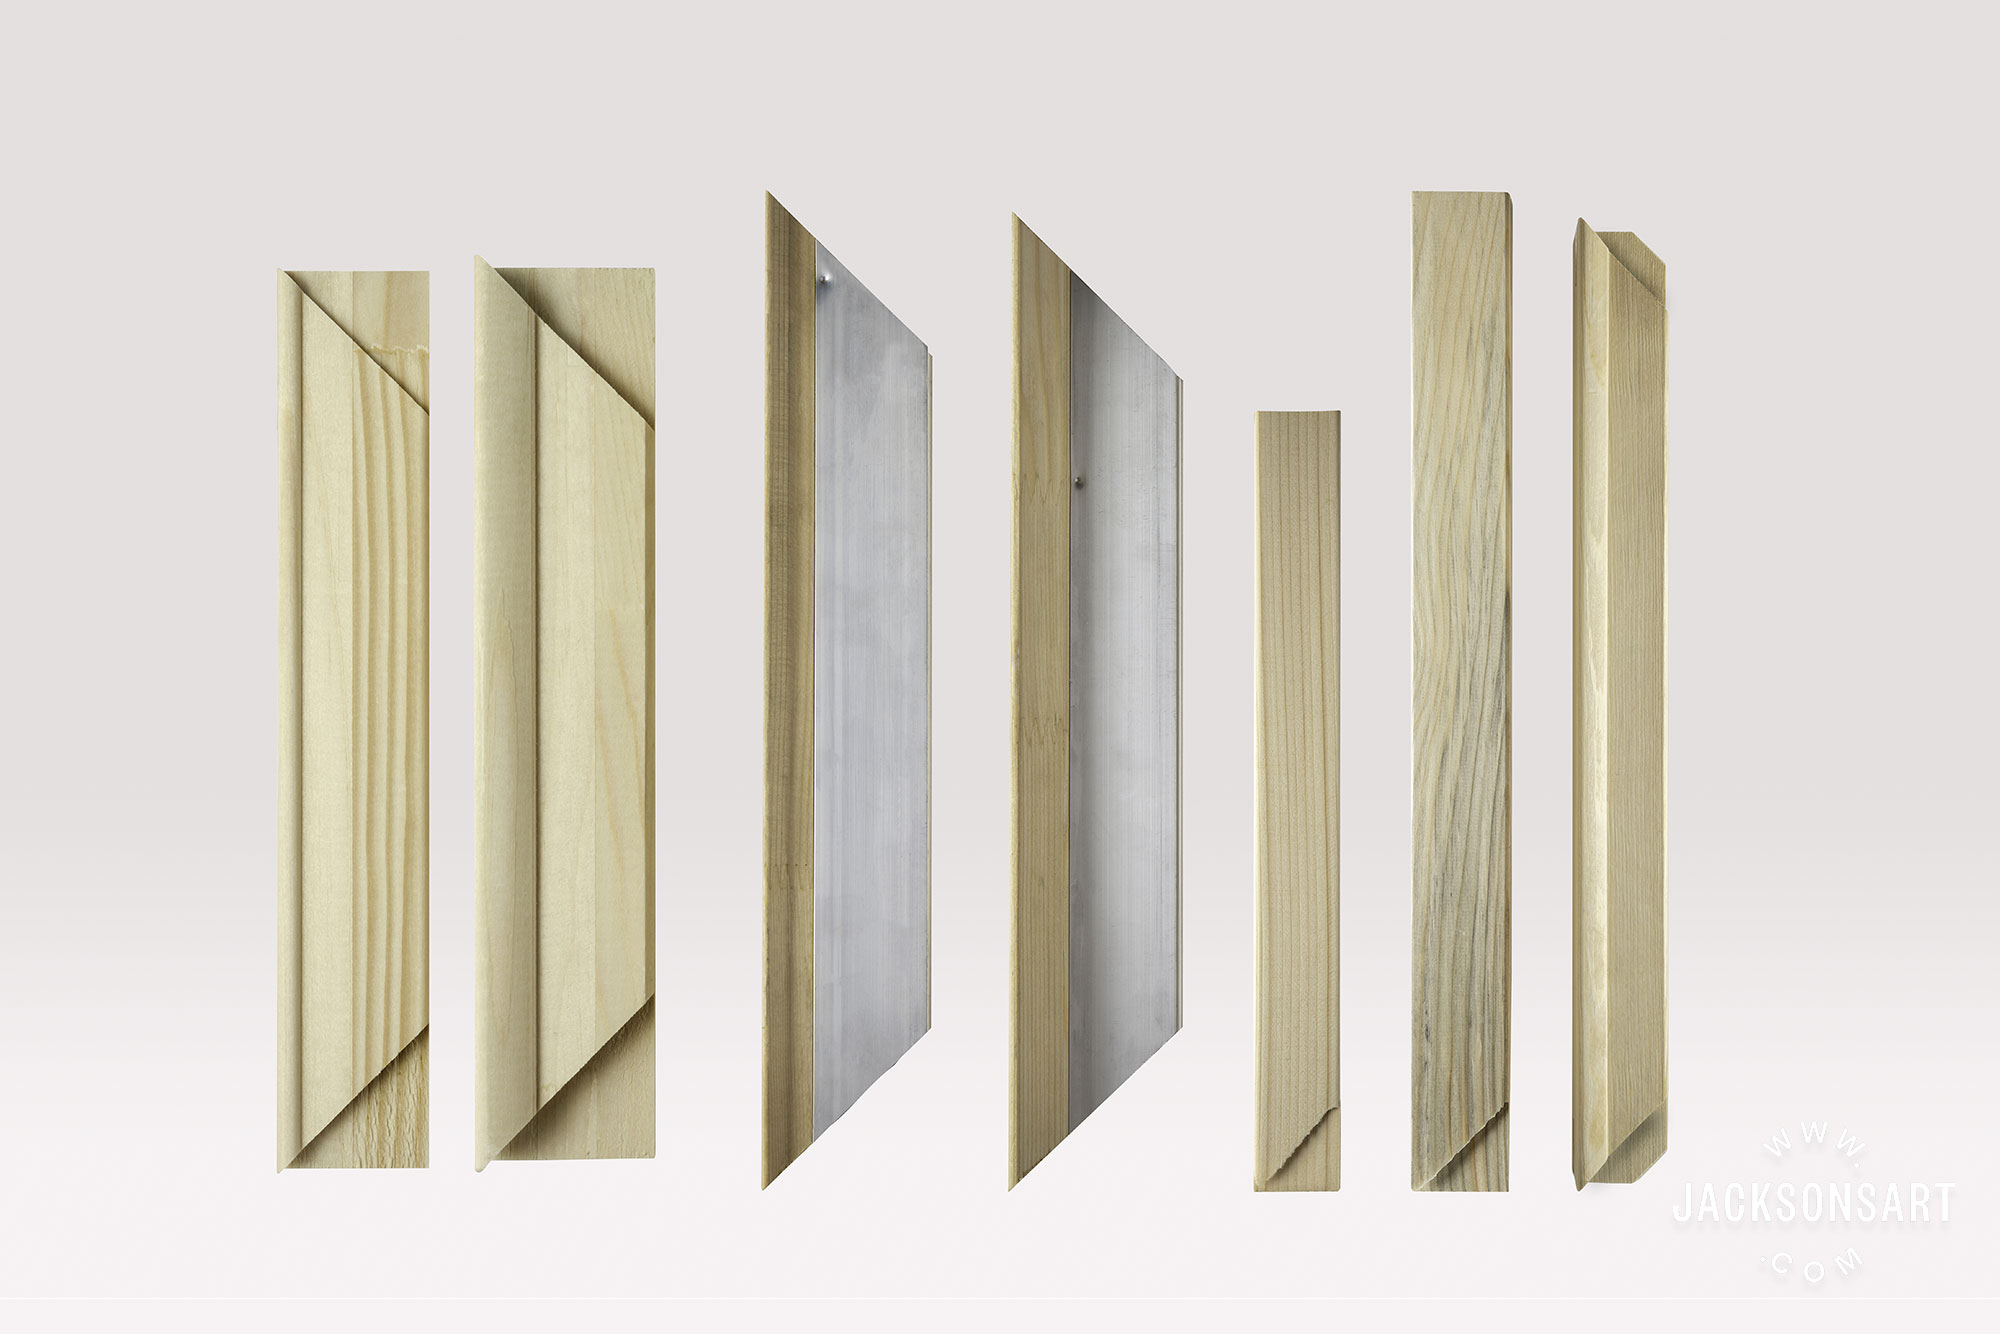
Stretcher bars come in different widths, depths and materials. Generally larger confined and bars made from aluminium are less likely to warp under peachy tension then are the best option for large canvases.
Choosing the sheet
You can compare some of the canvases Jackson'south stock by ordering sample pieces of the Claessens Linen or Belle Arti sample books. Many artists try painting on dissimilar canvases, primers and grounds until they find the surface that works best for the painting they are doing. The surface qualities can profoundly affect some artists' painting.
1. Fabric – Linen, cotton, jute
ii. Weave – The 'No Grain' texture is nearly equally smooth every bit paper and is bully for portraits where paint skipping over a weave pattern might interfere with the likeness of the figure. Y'all can choose from no grain, extra fine, fine, medium, crude and extra-crude.
3. Weight – The heavier the weight the more tension it can accept, then for very large stretched canvases you might wish to choose a heavier canvas.
4. Priming – Un-primed, universal primed, oil primed, glue sized.
5. Brand – Artfix (French linen), Claessens (Belgian linen), Belle Arti (Italian linen, cotton fiber and poly-cotton), Jackson's (Indian cotton wool).
In addition to the groovy strength of linen and the fantastic surface, information technology gives for painting linen has to enshroud among art collectors and so artists will normally mention in their materials list that it was specifically linen they painted on. Likewise, at that place is something poetic about painting in oils made with linseed oil on a linen canvas – both being made from the flax plant.
When stretching linen be certain to apply very potent stretcher bars because by the time yous get it tight there is a lot of force per unit area on the bars. Light-duty bars are easily warped out of shape. Also, make sure the corners of the stretcher bars take no precipitous points. These should be sanded off before stretching the linen every bit this sharp edge may finish upward cutting the linen when information technology is pulled tightly over it.
It is easier to go an even stretch with primed linen than unprimed linen. There is a trick I have heard of, of applying water to the dorsum of a saggy linen canvass, and as the sag reappears later a week you lot go along this up for a few weeks and somewhen, it more often than not disappears. I have found that this is true of hot water applied to a dent in the canvass, a pushed up little betoken in the sail (cotton or linen), but I take never had information technology work on shrinking canvass that is sagging. All quality oil-primed linen is sized with constructed glue (instead of the classic rabbit pare glue which has been found to cause bug over fourth dimension by arresting moisture from the air and swelling) so y'all can use h2o to assist tighten it, if you want to requite it a try.
Also, remember with unprimed linen that yous don't want to stretch tight – evenly but non tight – because when you add the sizing or primer the water volition cause the sail to compress and tighten – if there is too much tension the confined will bow significantly every bit the linen is pulled too tight.
Stretching unprimed linen takes practise. When stretching linen instead of starting in the heart of each side and creating a diamond shape some artists start past stapling the 4 corners first, making certain that the bars are following the weave lines, then stretching as yous would cotton fiber and when you lot get to the corners remove the staple there and fold the corners as normal.
Read more than in our canvas weblog article – Choosing the Correct Canvas.
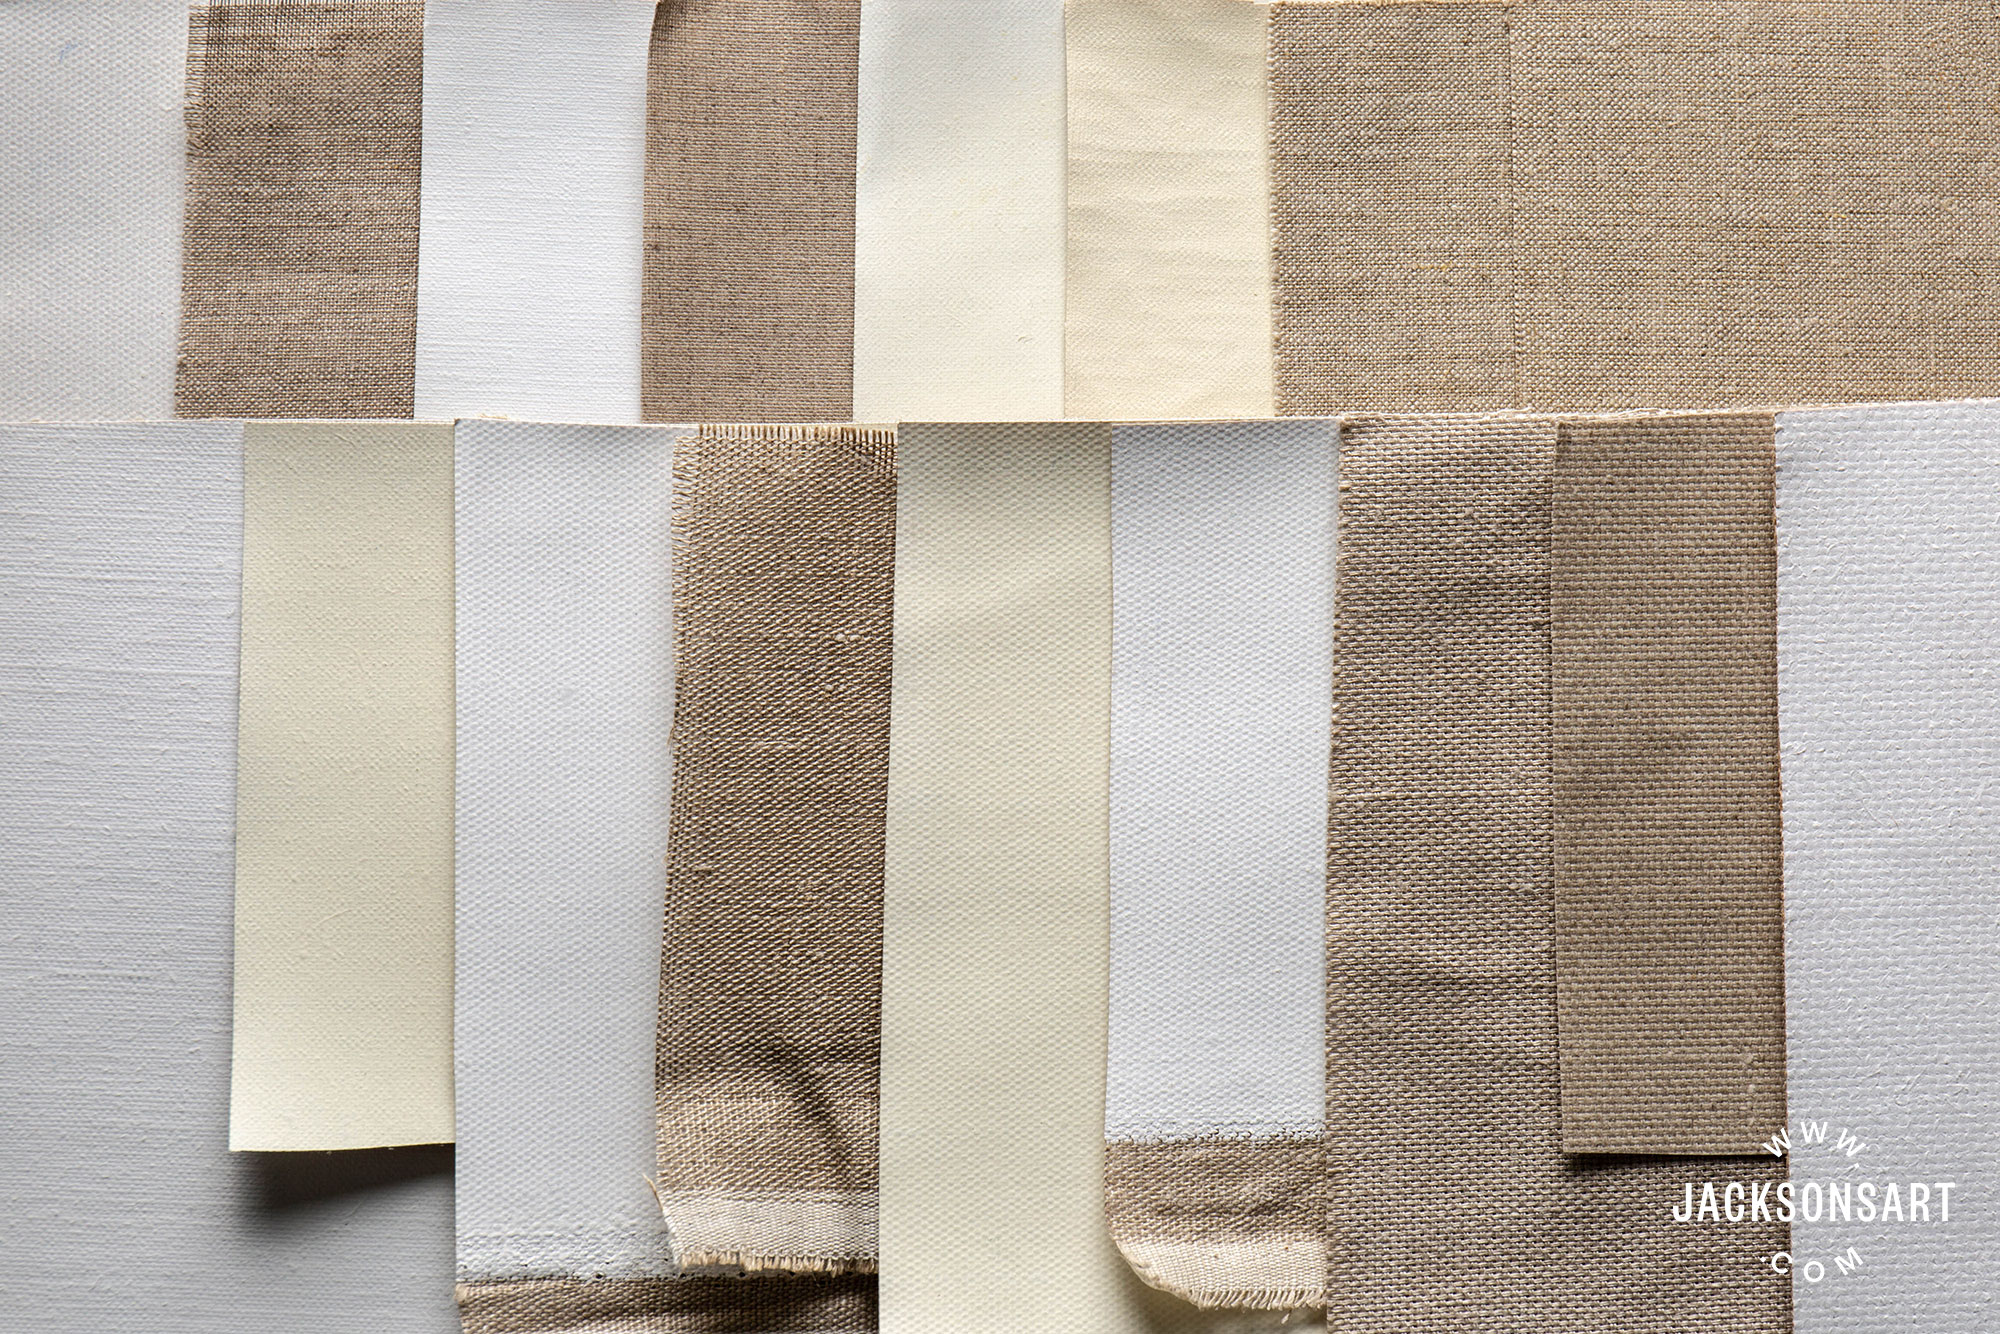
These are just some of the variety of linen canvas bachelor. Yous tin select the roughness of the weave, the weight of the thread and the blazon of primer (or unprimed). The pattern in the grain of the weave also varies by maker.
The amount of sail
Sheet comes in rolls which are two.10m or one.83m broad and 10m long. Yous tin purchase the full ringlet or metres cut off the roll (these must be whole metres, not fractional).
The corporeality of sheet you will need is affected by how thick the bars are and if you are wrapping effectually the bars to the back. About artists do a 'gallery wrap' these days, wrapping effectually and stapling on the back, simply some still use tacks on the sides. For standard-depth bars add ii-3cm for the confined thickness plus 3-5cm to wrap around to the back and for gripping to pull- this means adding 5-8cm to each side or about 10-15cm to each measurement of the canvas rectangle. Then for a 60x60cm standard-depth stretched canvas you lot would need a 75x75cm slice of sail. For deep-profile bars add 20cm to each side measurement. So for a 60x60cm deep-edged stretched canvas you would need an 80x80cm piece of sail. Whatever actress is useful for having something to grip with the pliers and pull on, the excess can then be trimmed off or for a super strong and neat edge it can exist folded nether and the second row of staples added to hold the fold downwards.
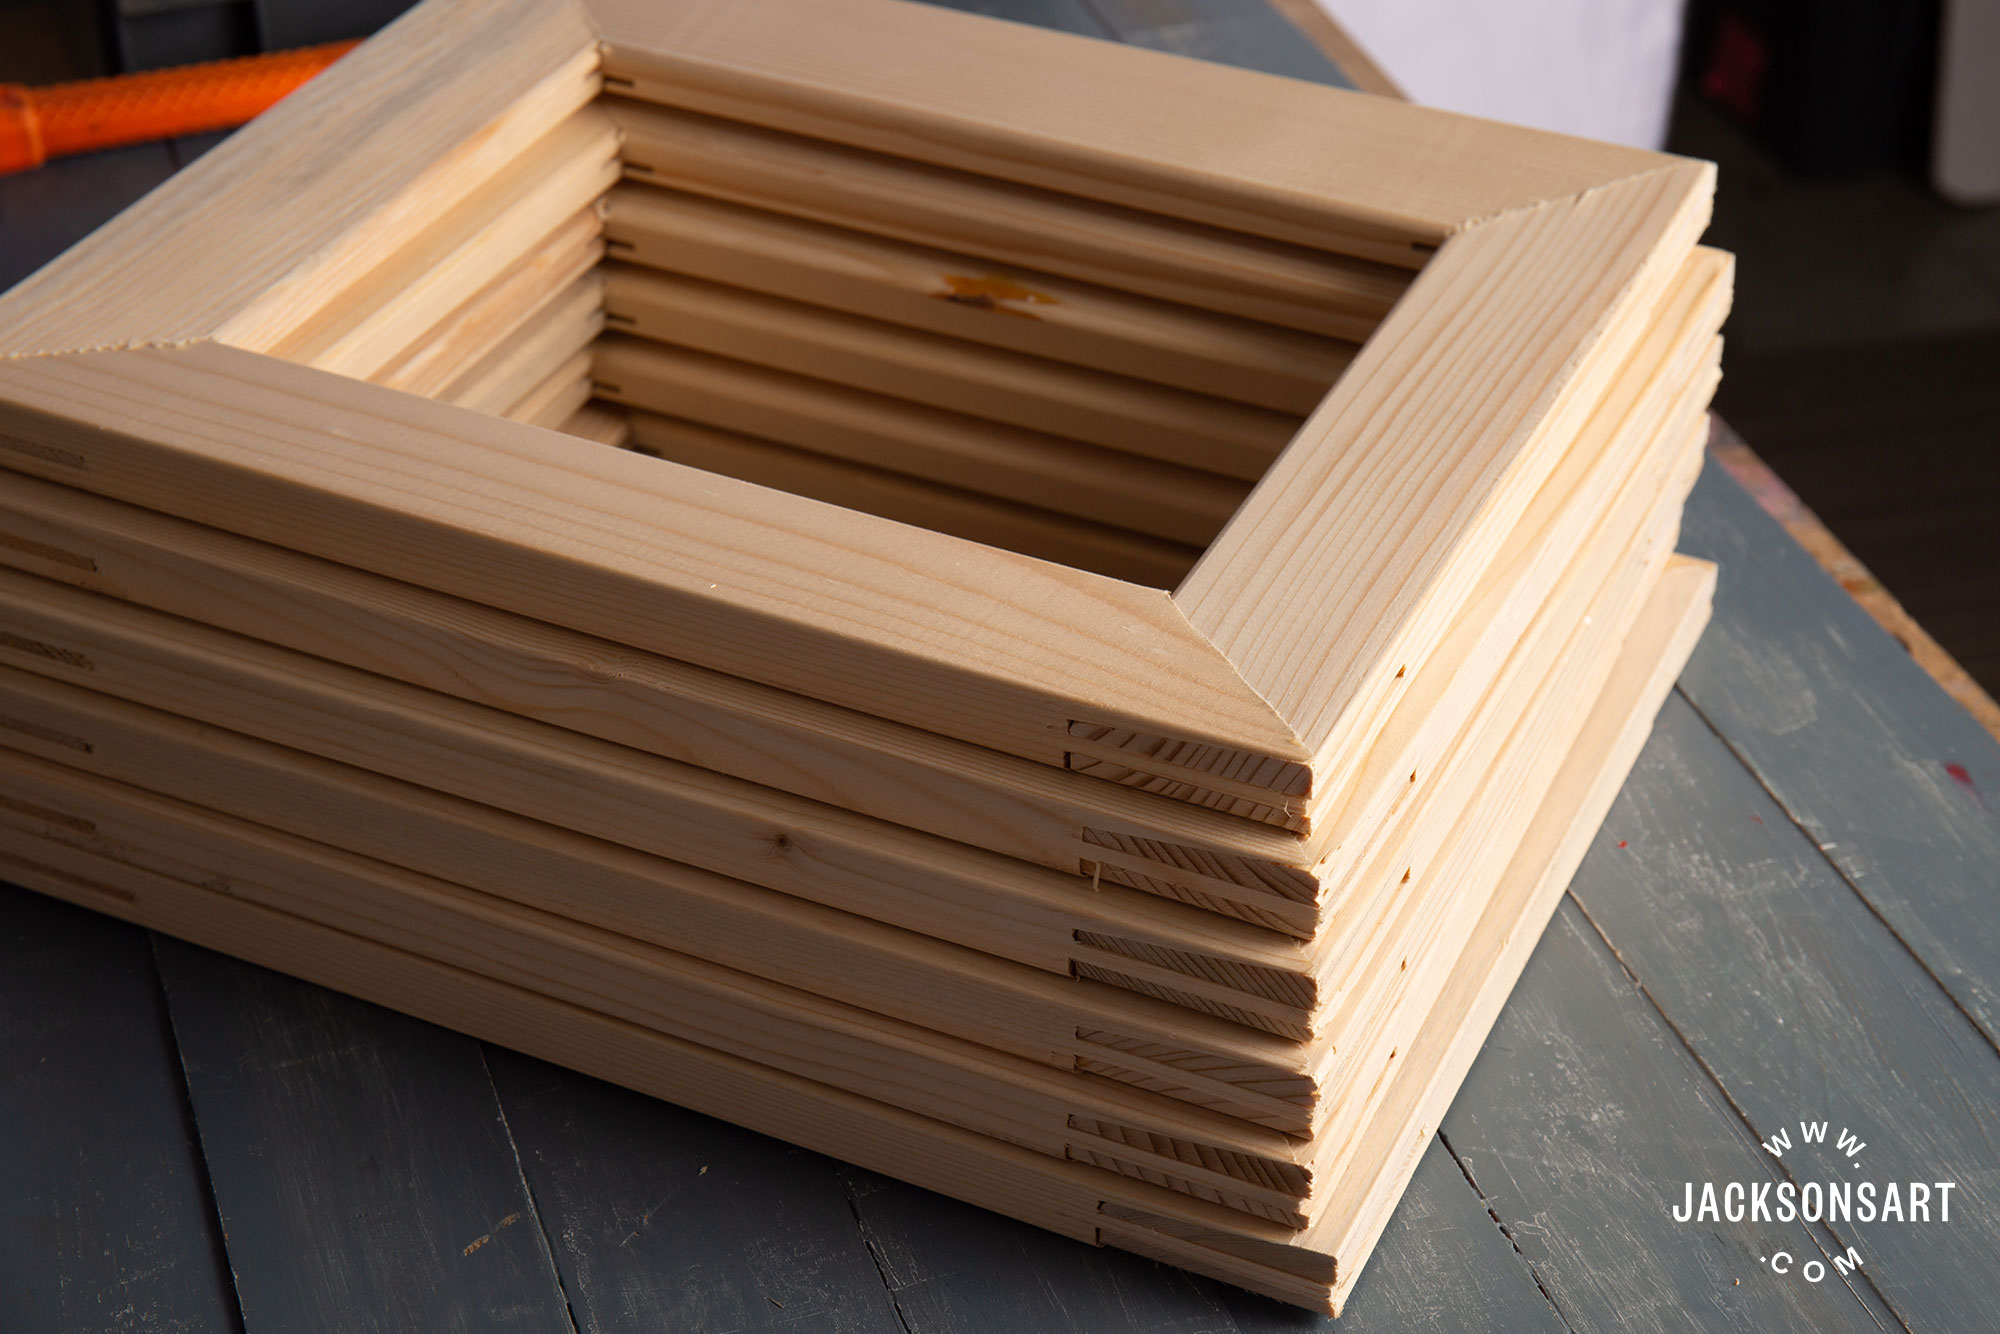
Assembling the stretcher frame
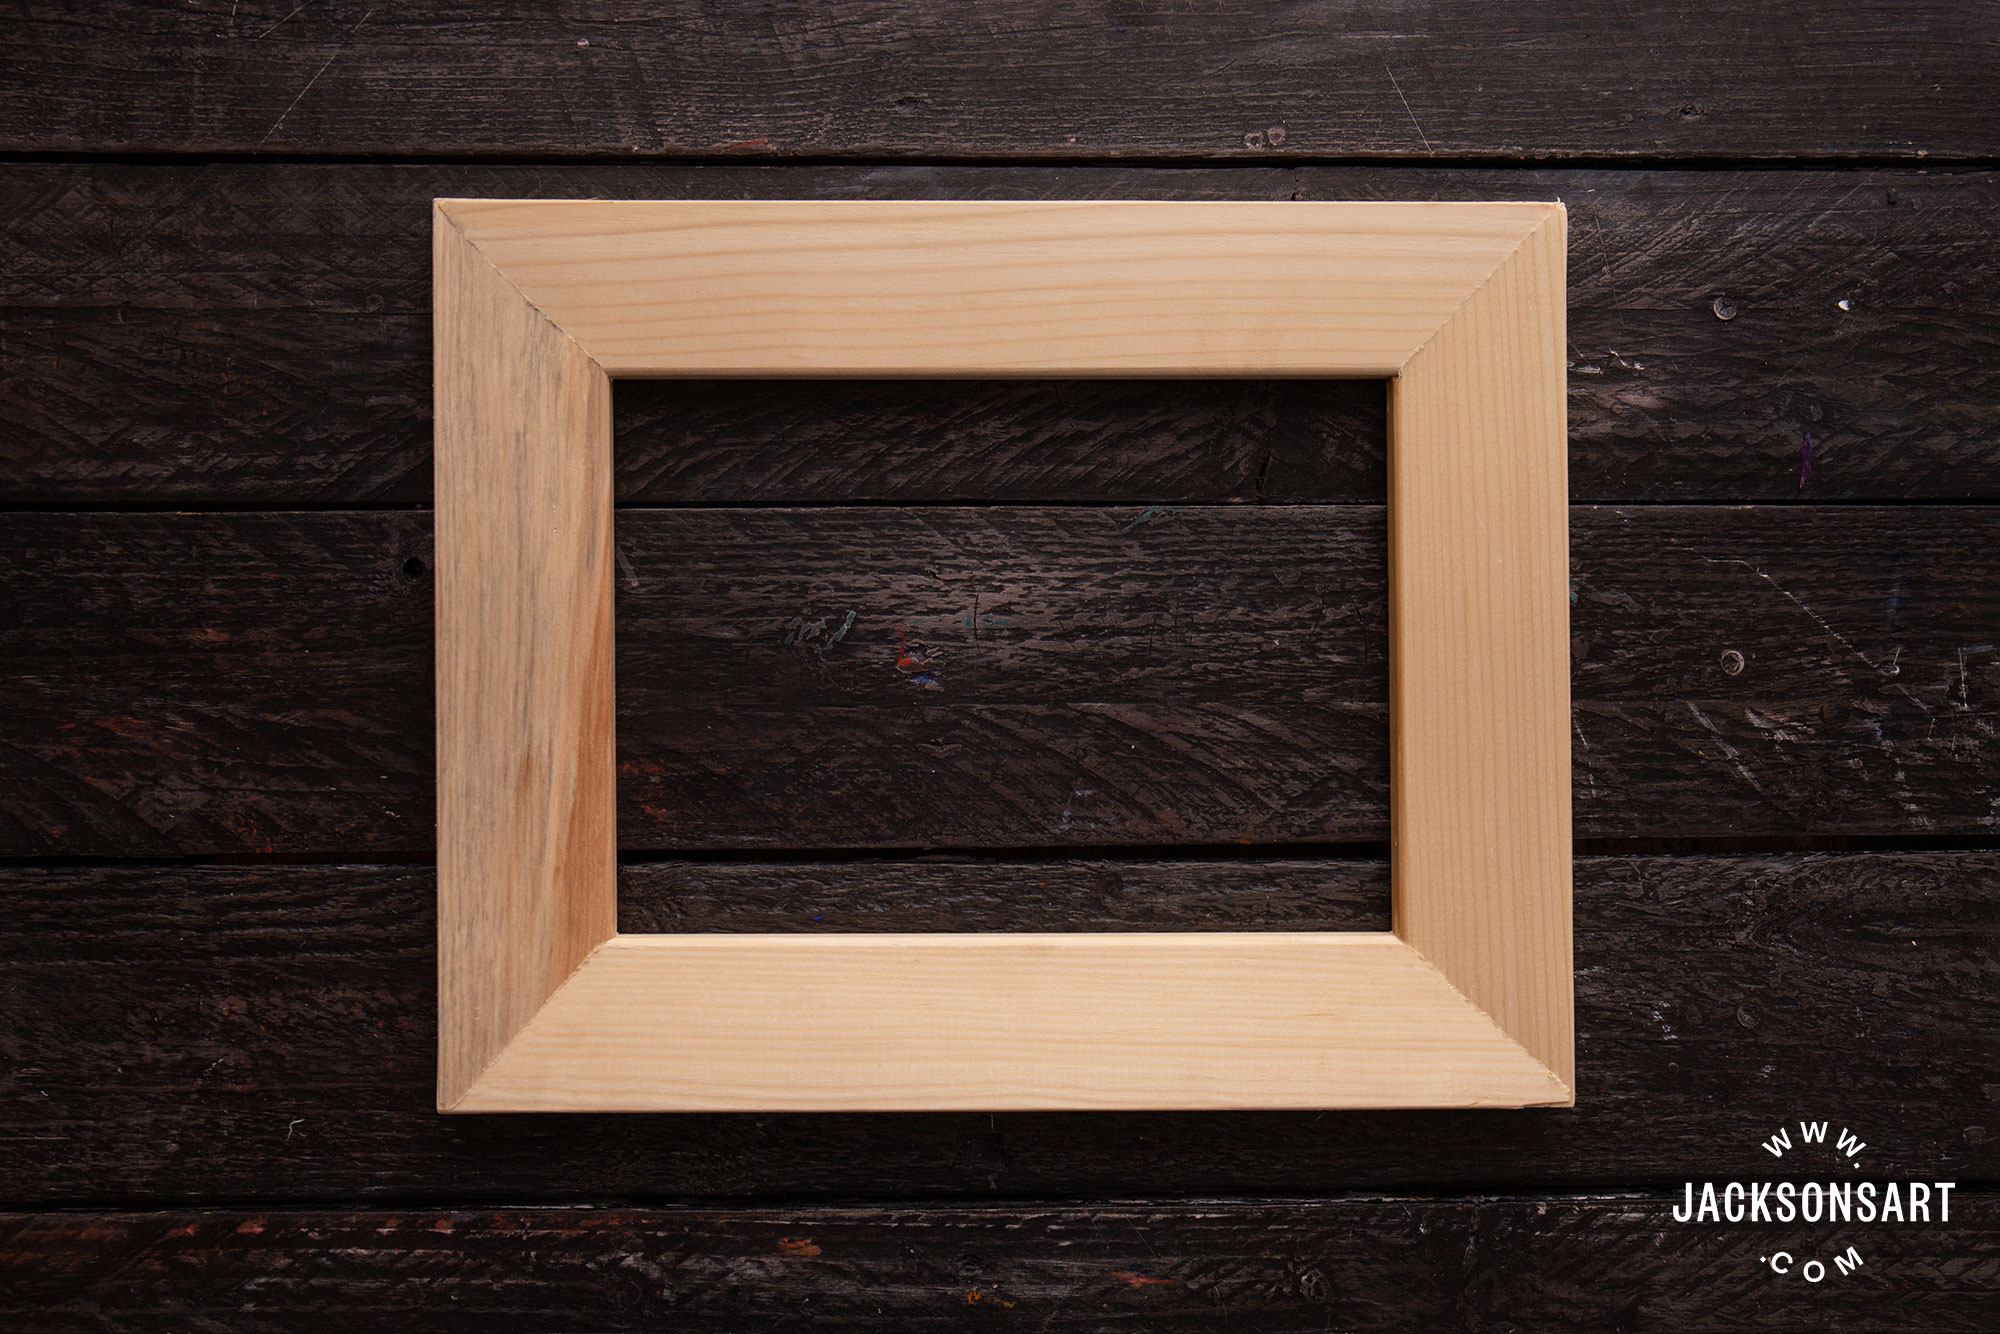
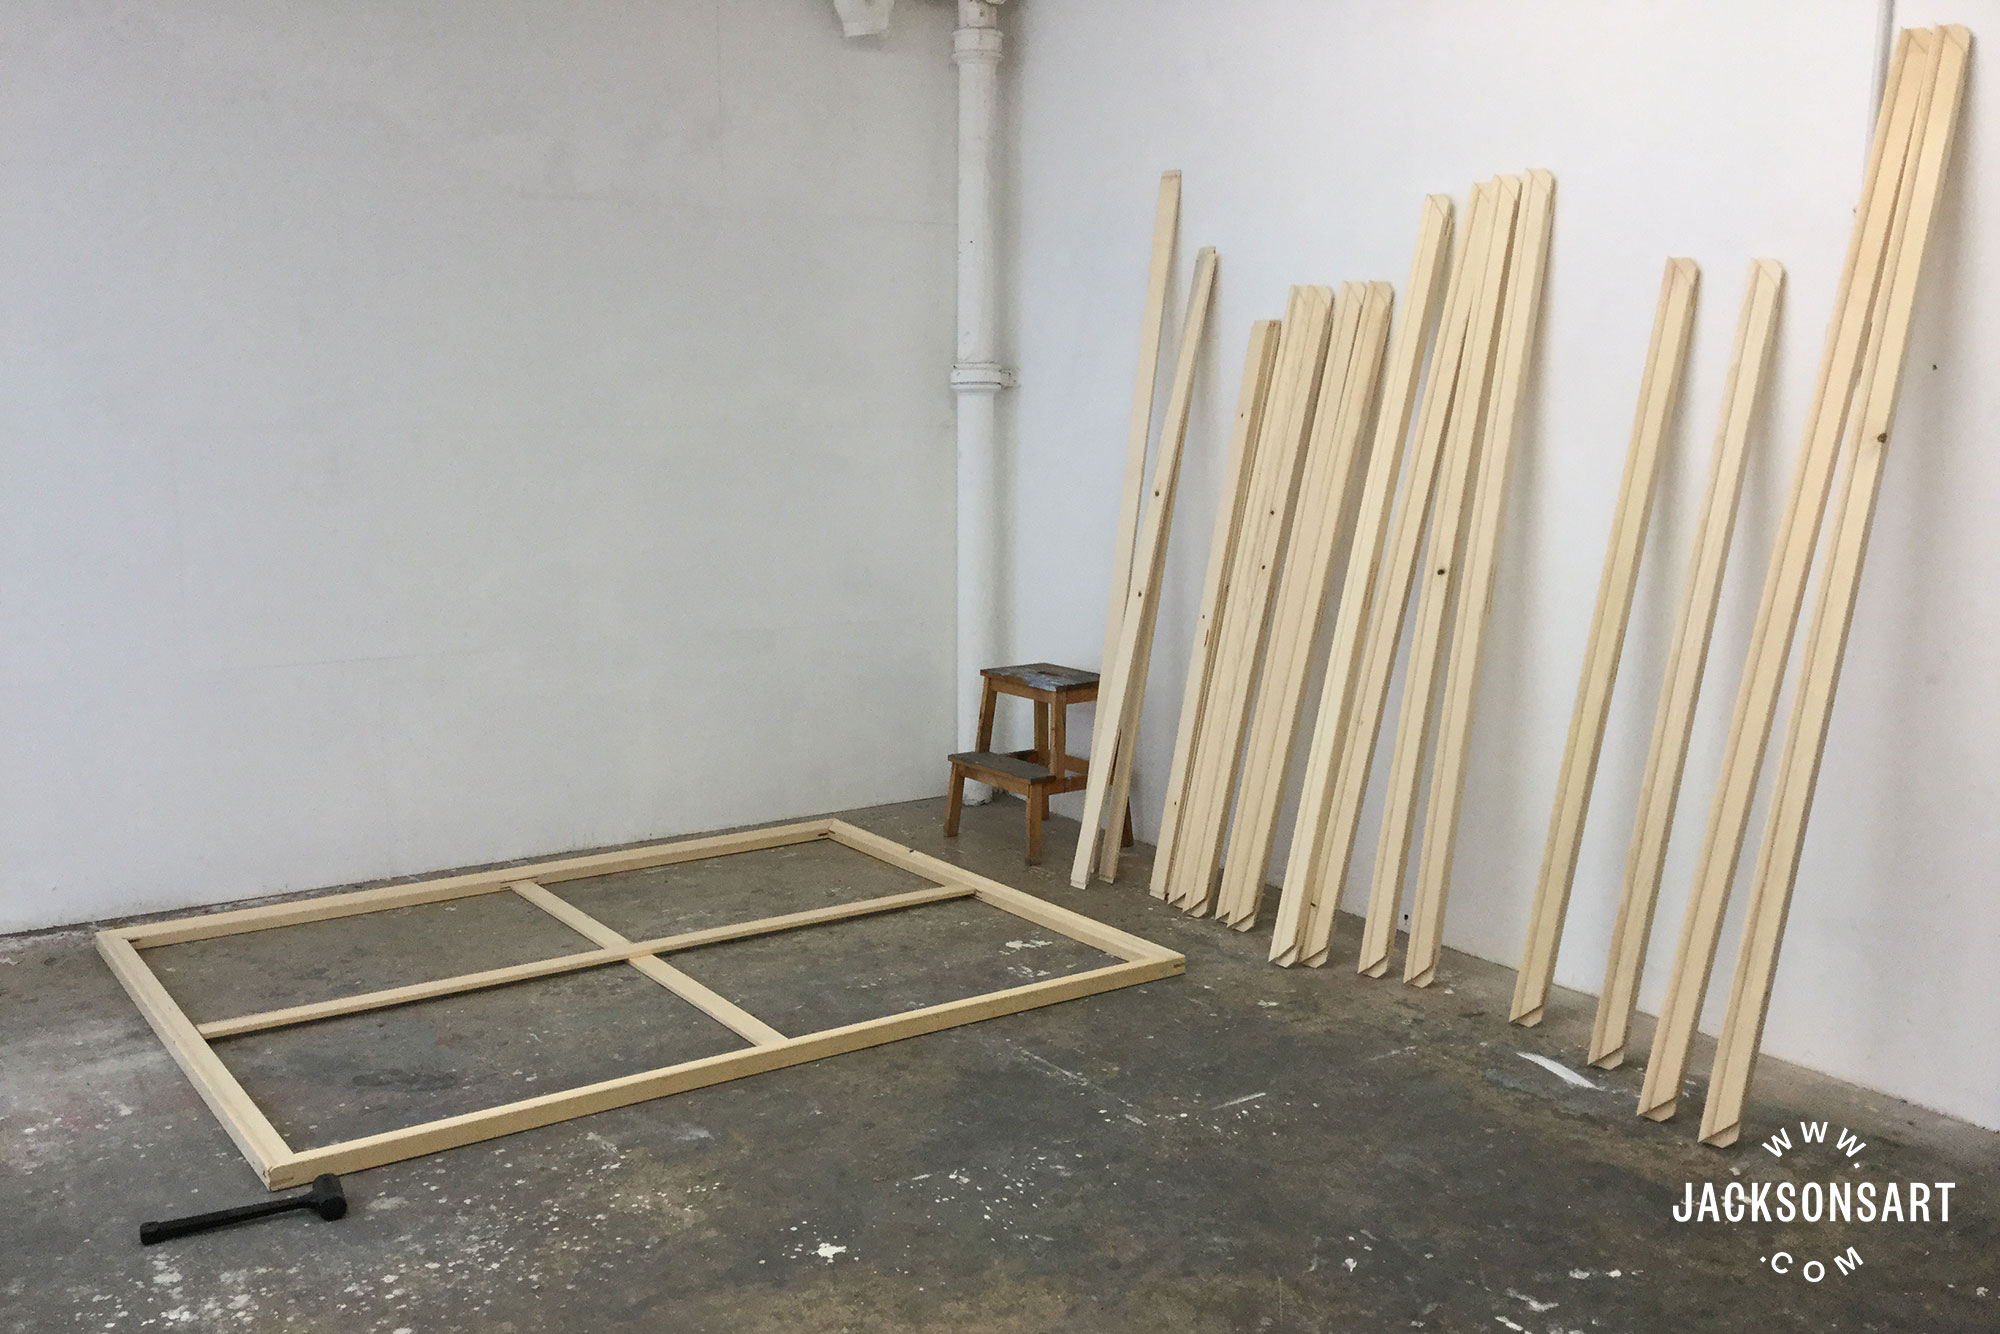
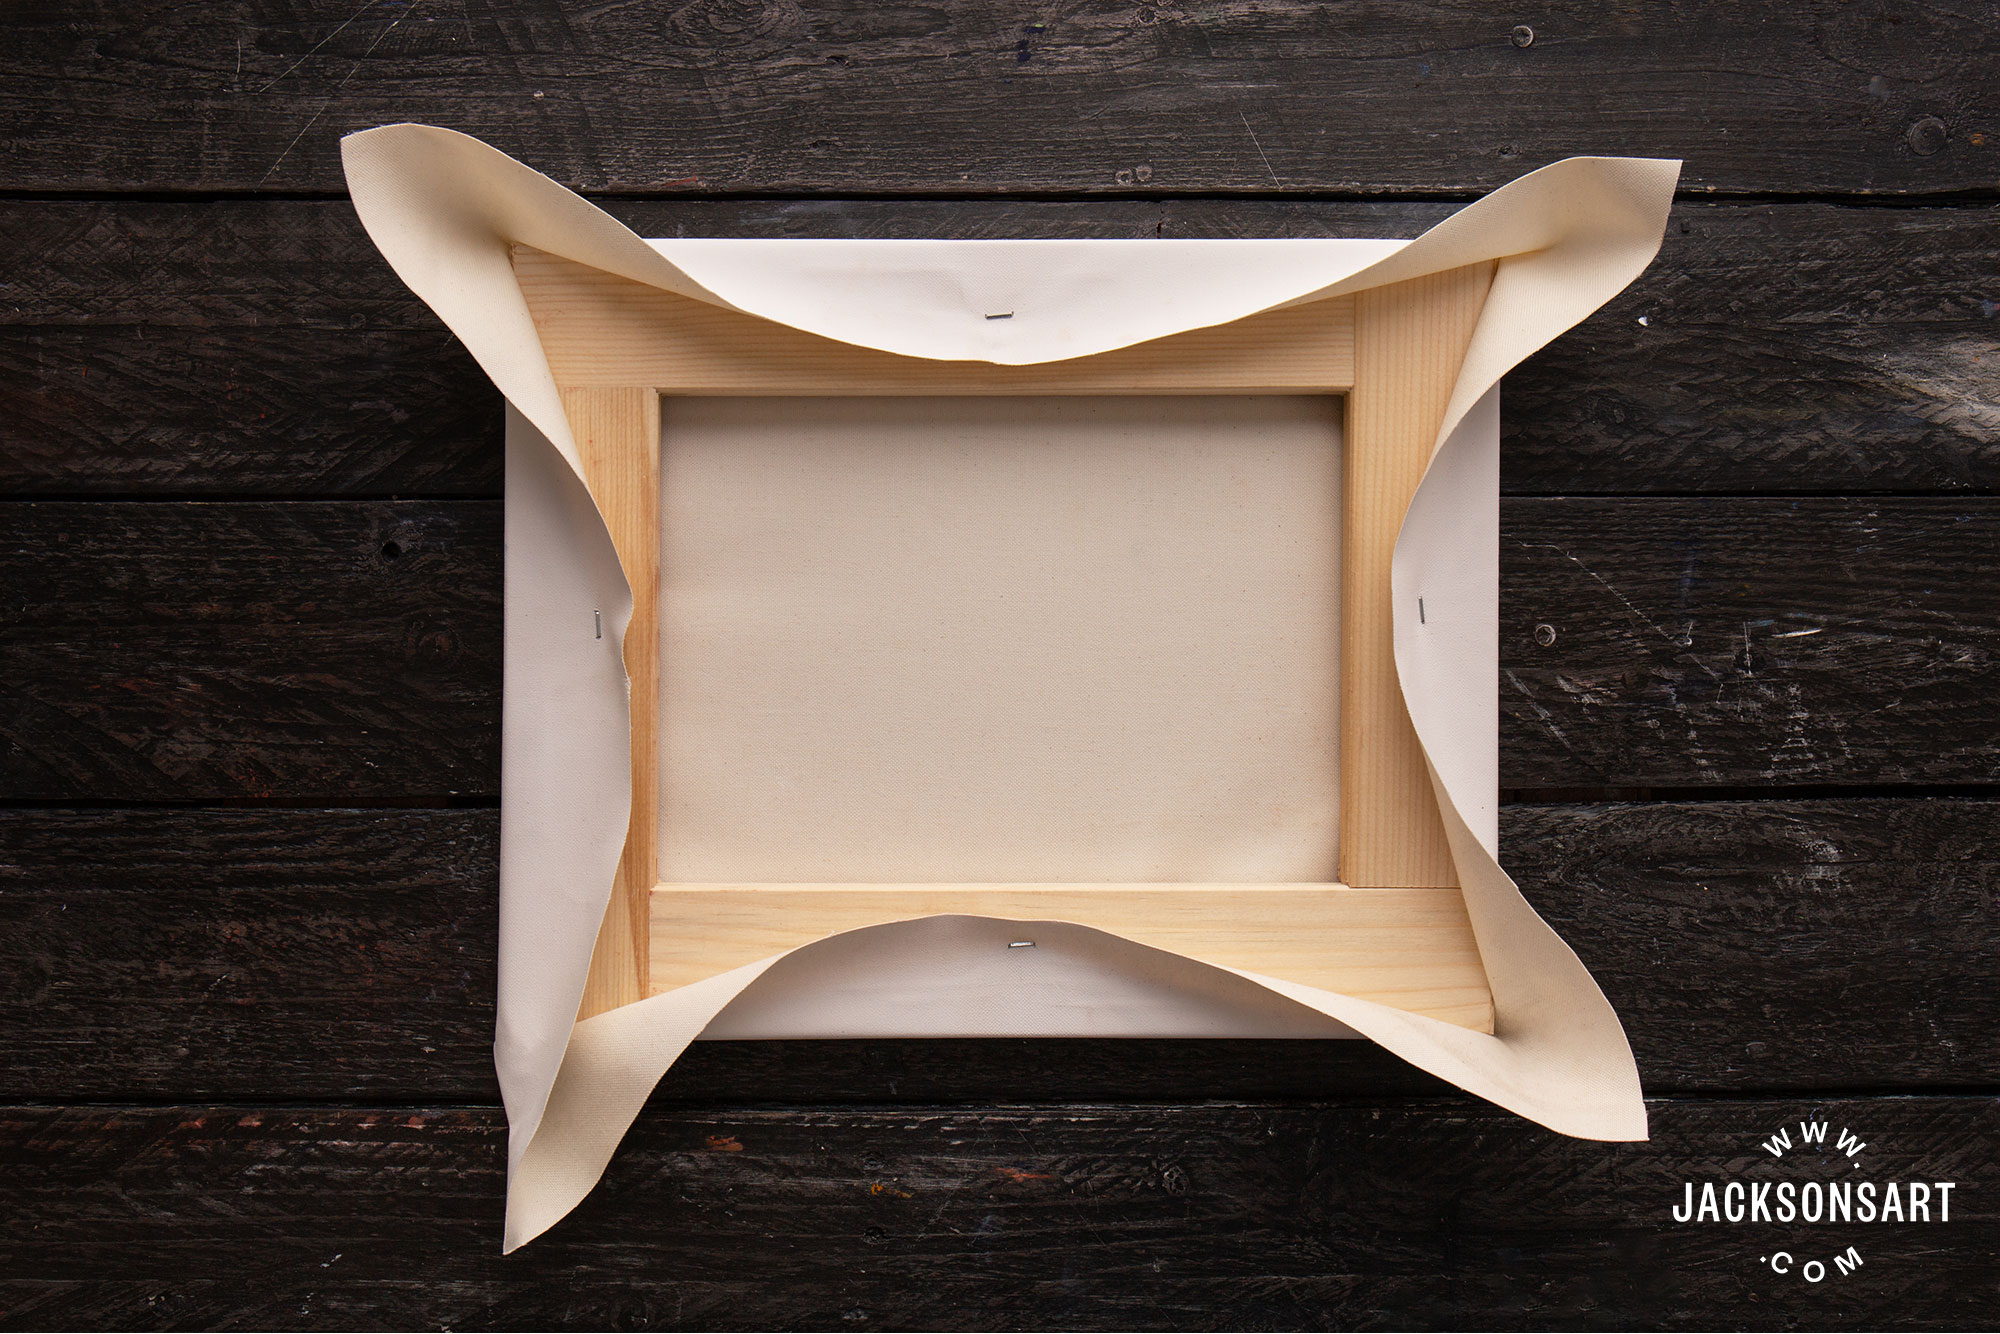
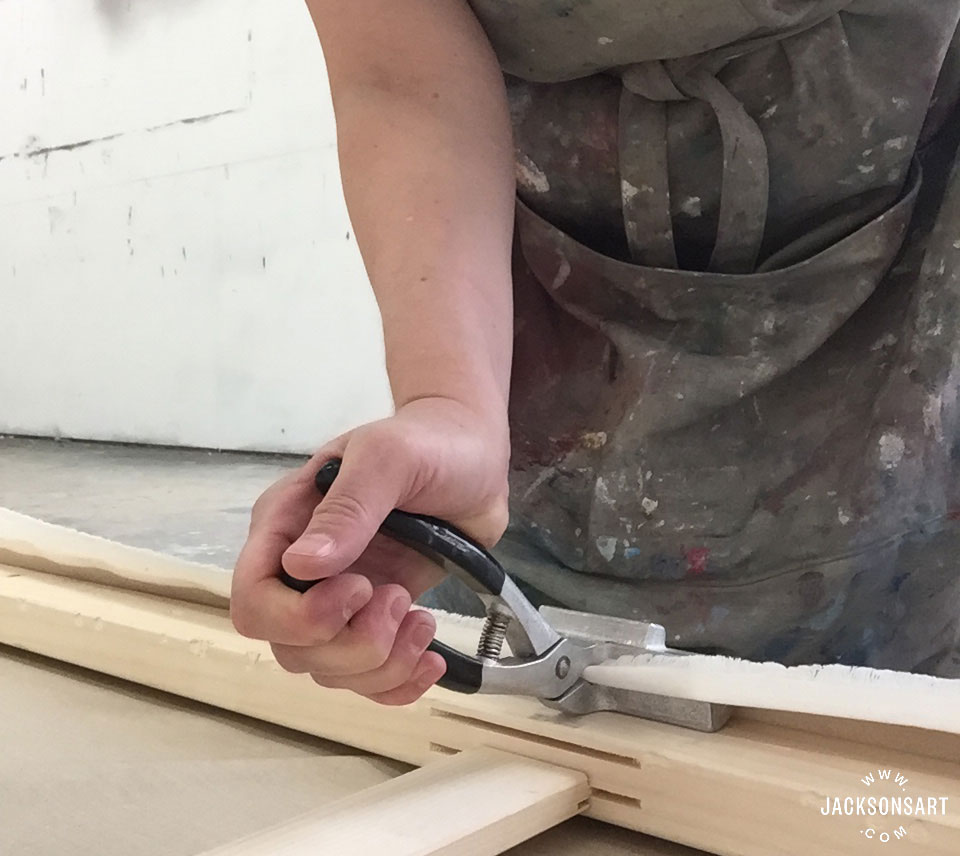
Lay out two pairs of stretcher bars – ours are cut with a mitred mortise and tenon joint so no boosted fixing is needed. Each corner bring together will consist of a flat slot end inserting into an angle flap stop. All the confined have a cantilever so the canvass is stretched over bars that slant down towards the centre of the frame then y'all don't go an impression from the edge of the bar on the canvas from behind as you pigment, the canvas just touches the very outside rim of the stretcher frame. The deep-contour bars have a roll of extra woods to create a rim around the exterior of the stretcher frame and the standard depth confined are shaped to gradient at an bending. Be sure the flat sides are all facing down and then then you will have the angled sides all facing upwards to create the cantilever. Utilize a rubber mallet to knock them into place. If you only have a hammer y'all tin use it instead but be sure to use a piece of scrap woods between the hammer and the stretcher bar as hammer dents can show as visible dents in the side of your stretched sheet, it pulls so tightly all contours of the wood are followed, especially if the paring is on a part where the sheet touches.
Inspect the outer edges of the frame. On occasion, a very precipitous corner may need sanding so that it doesn't damage the canvas when it's pulled very tightly over information technology.
If you lot've hammered all the corners every bit far as they volition go it should be very near foursquare (all the corners at 90 degrees). Simply you should always cheque each one. Measure both diagonals and compare the measurements to ensure you have created a perfect rectangle – the 2 measurements should exist very near the same. Tap a bit at the sides of the corners until both diagonals are the same.
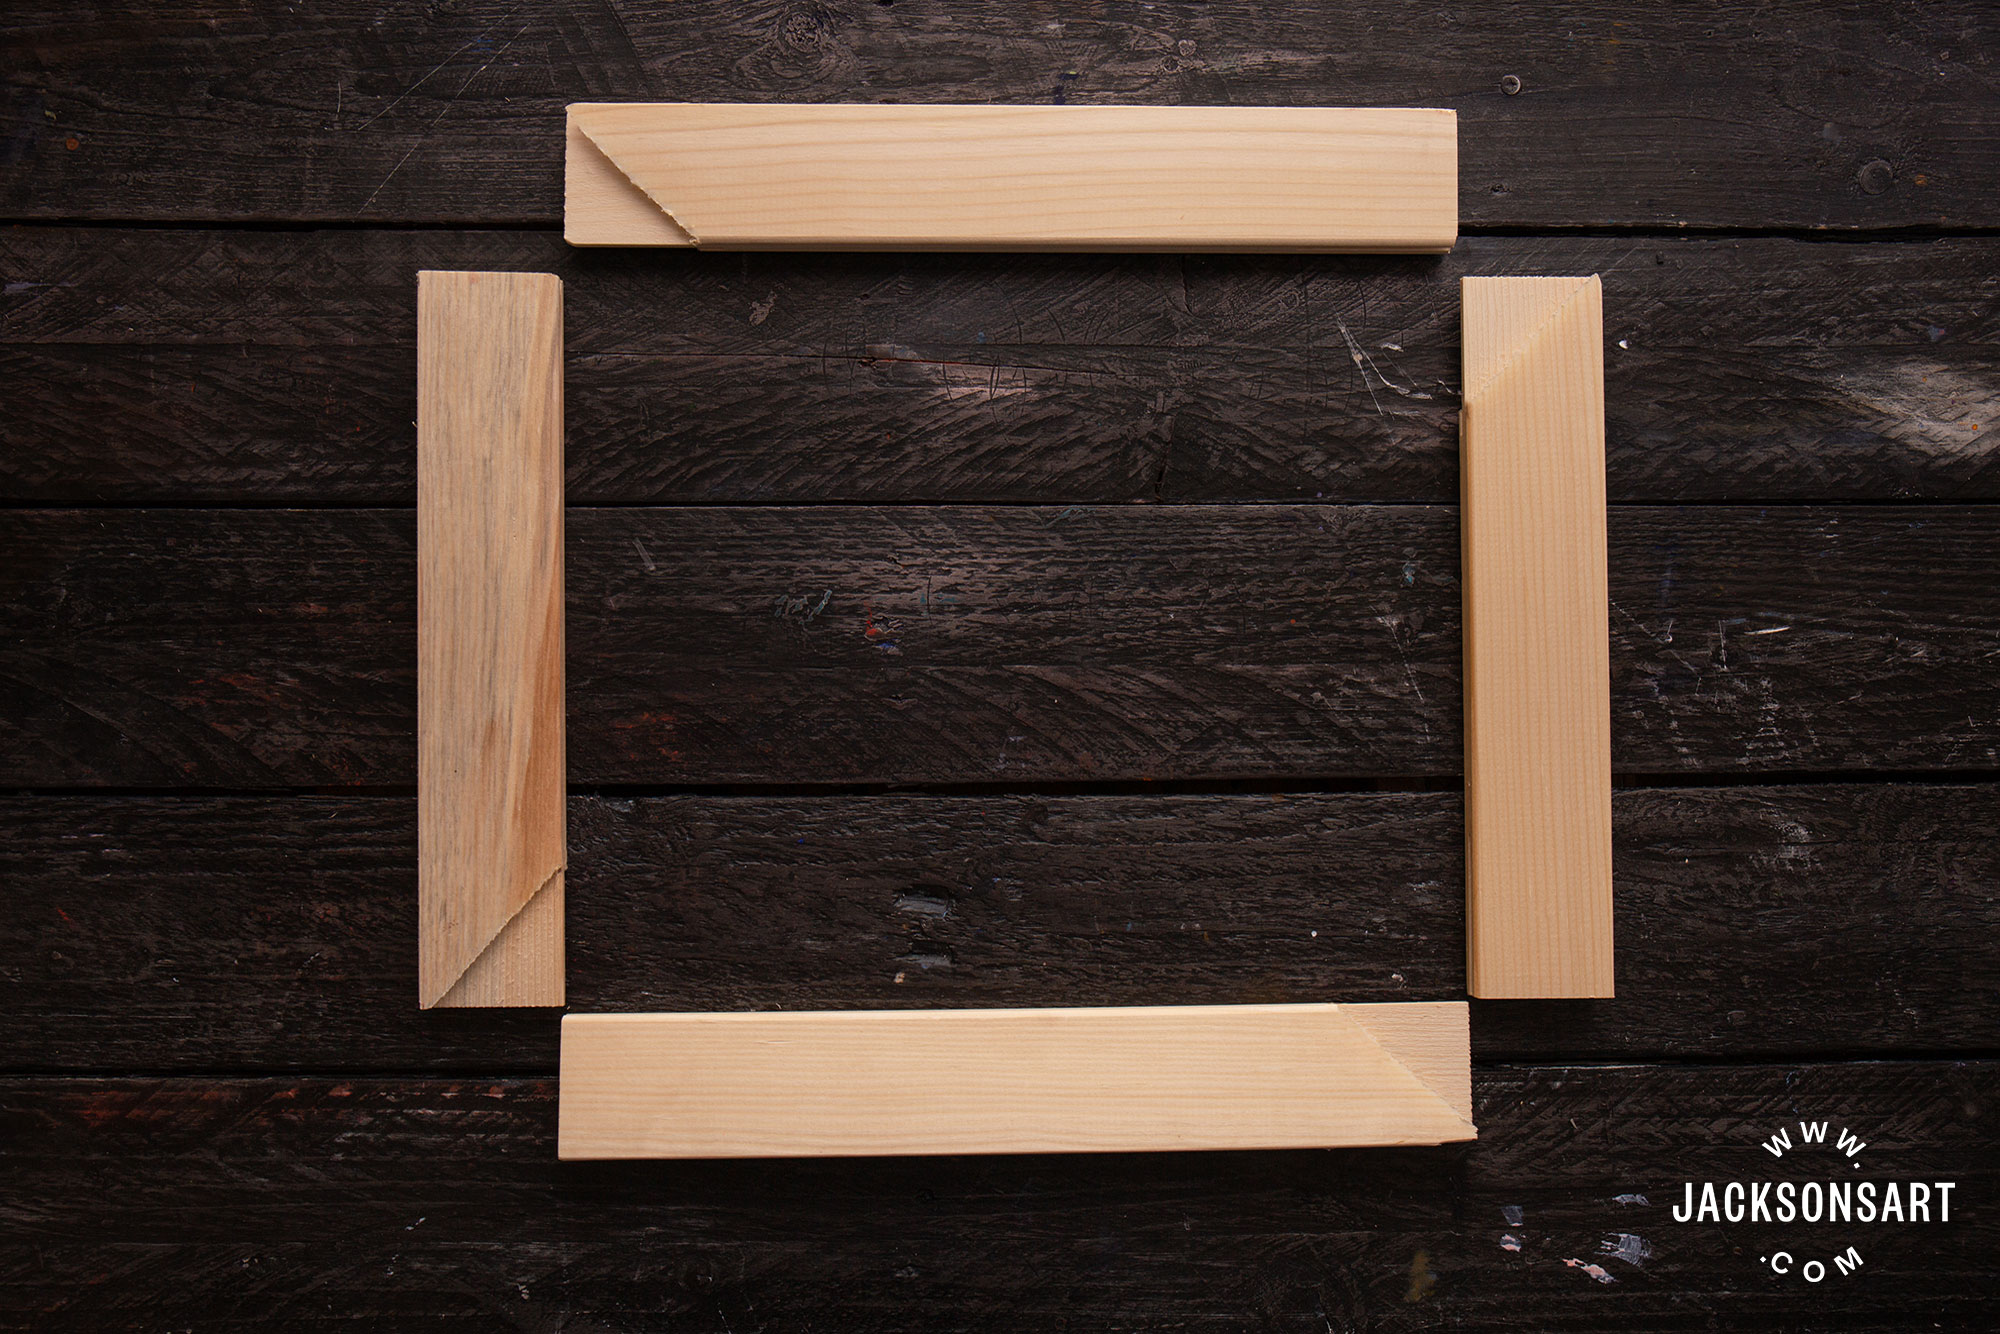
It speeds upwardly the process to lay out the confined with the triangular end facing the same way all around in a circumvolve. Then you are certain to be assembling them with the deep side outward slanting down toward the centre and that the right ends match up.
Insert the ends into each other and turn the frame on its side to utilize a mallet hammering downward to hit each border near the corner. Rotate the frame and continue hitting until all the corners have joined and they will insert no further. It is best to rotate a few times and hit them in gradually just still amount rather than do one corner all the style and then motion to the side by side.
To insure your sheet will be on the square you can measure the two diagonals and tap the corners until the measurements are the aforementioned.

For measuring across a distance you cannot reach, when you do not accept an assistant, it helps to employ a prop under the tape measure and then information technology stays put.
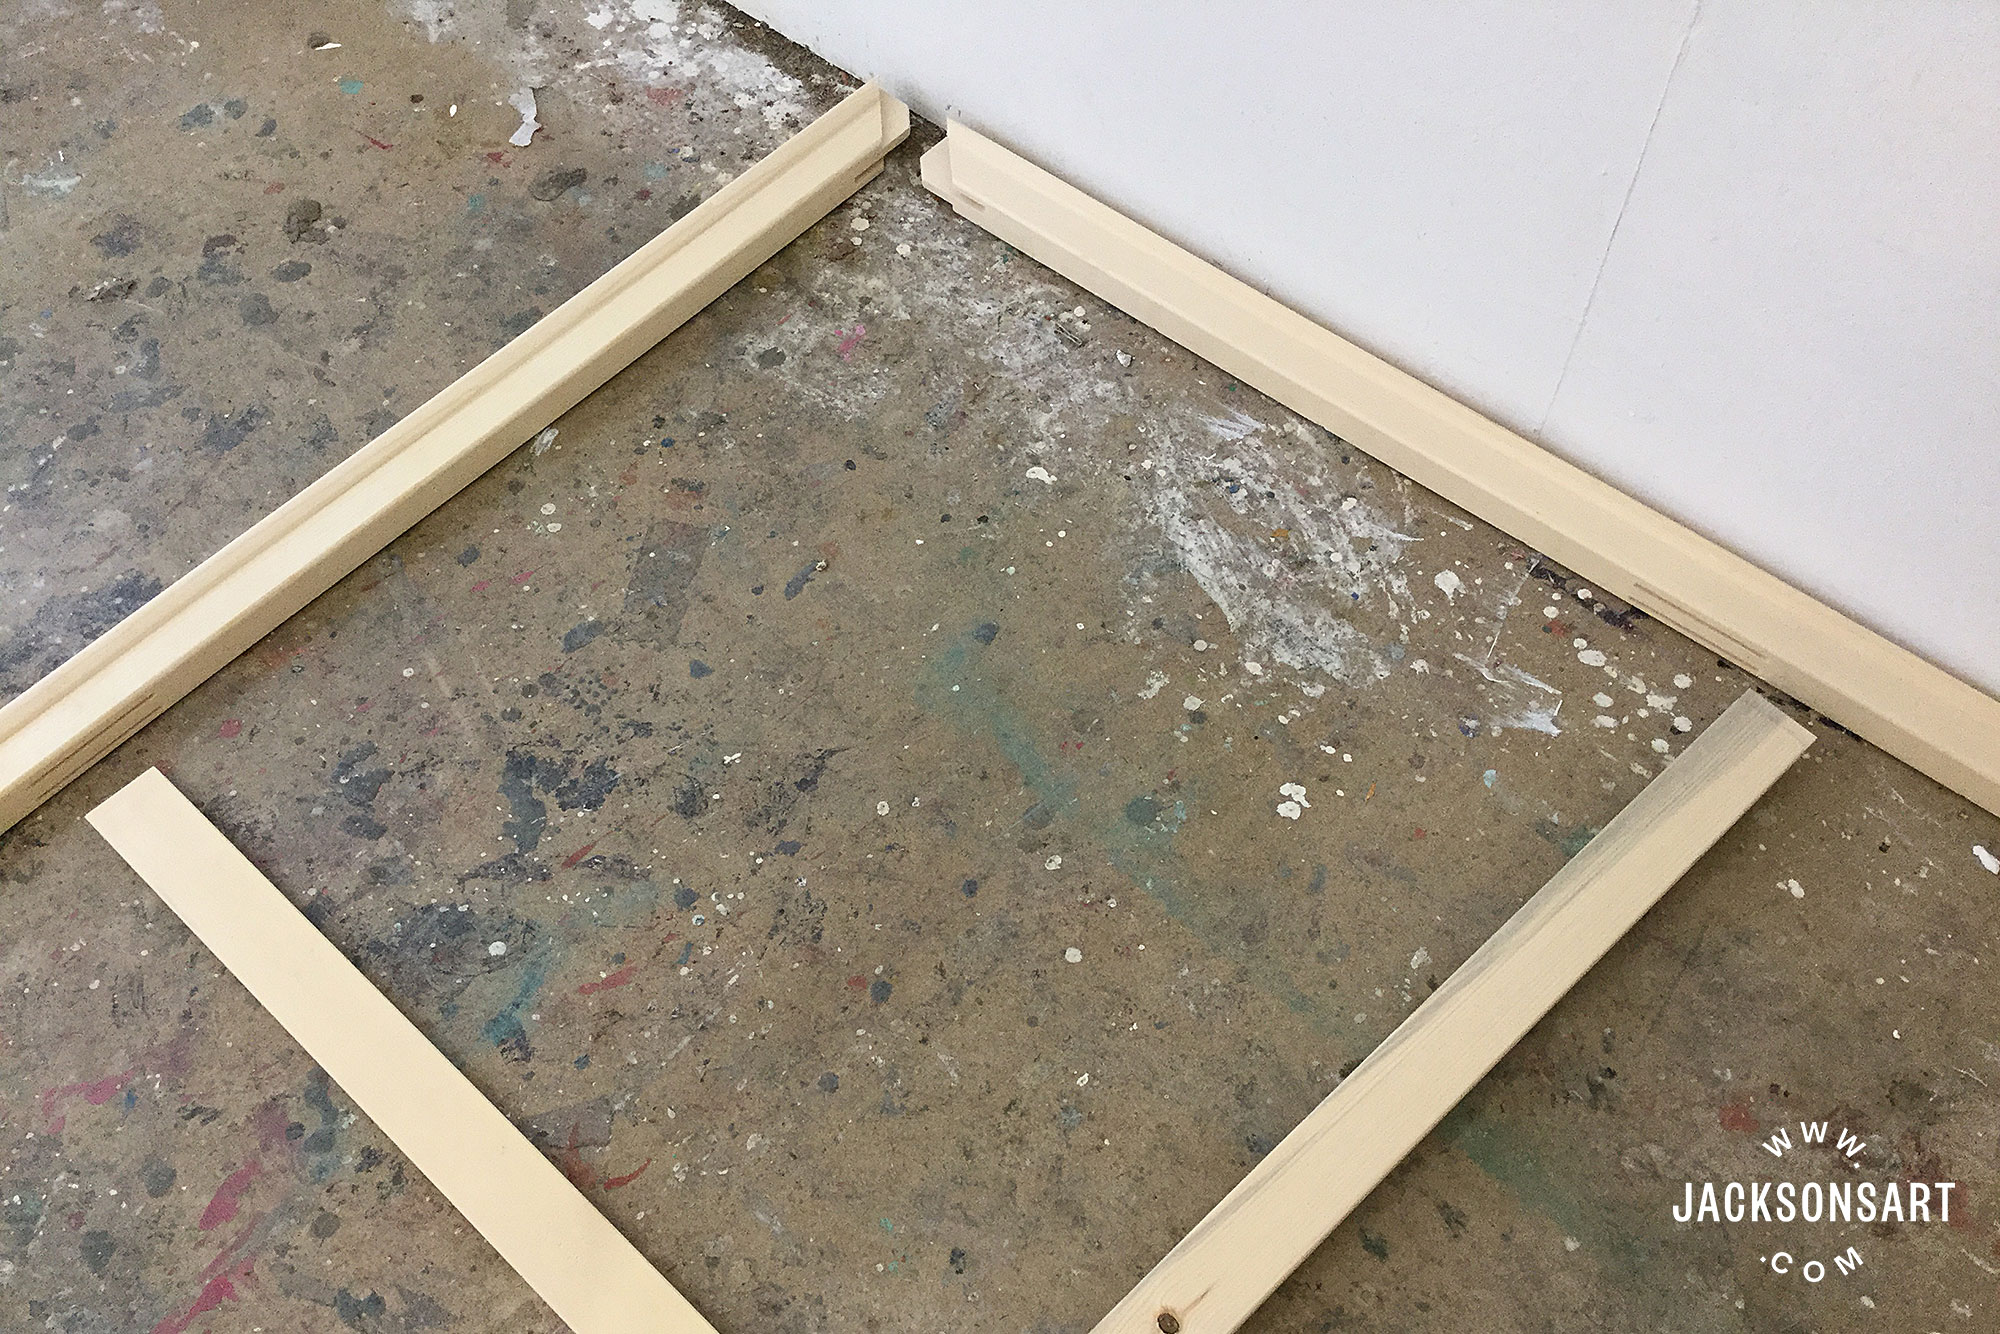
Small stretcher frames can be built on a table simply large ones usually demand to be made on the floor. Here is the corner of a 180x200cm frame laid out prepare to be assembled with 2 cross bars. The cross bars must go in at the same time every bit the corners go together, information technology must all be tightened upwards together.
Stretching the canvas
- Add together xx to 30cm to your stretcher frame measurements for wrapping around to the dorsum on both sides and cut your piece of canvas from the roll using heavy duty pair of scissors or a knife and straight border. (20cm for standard-depth, 30cm for deep-profile)
- Lay the canvas piece on a clean floor or table, if it is primed, ensure that the primed side is confront downwards.
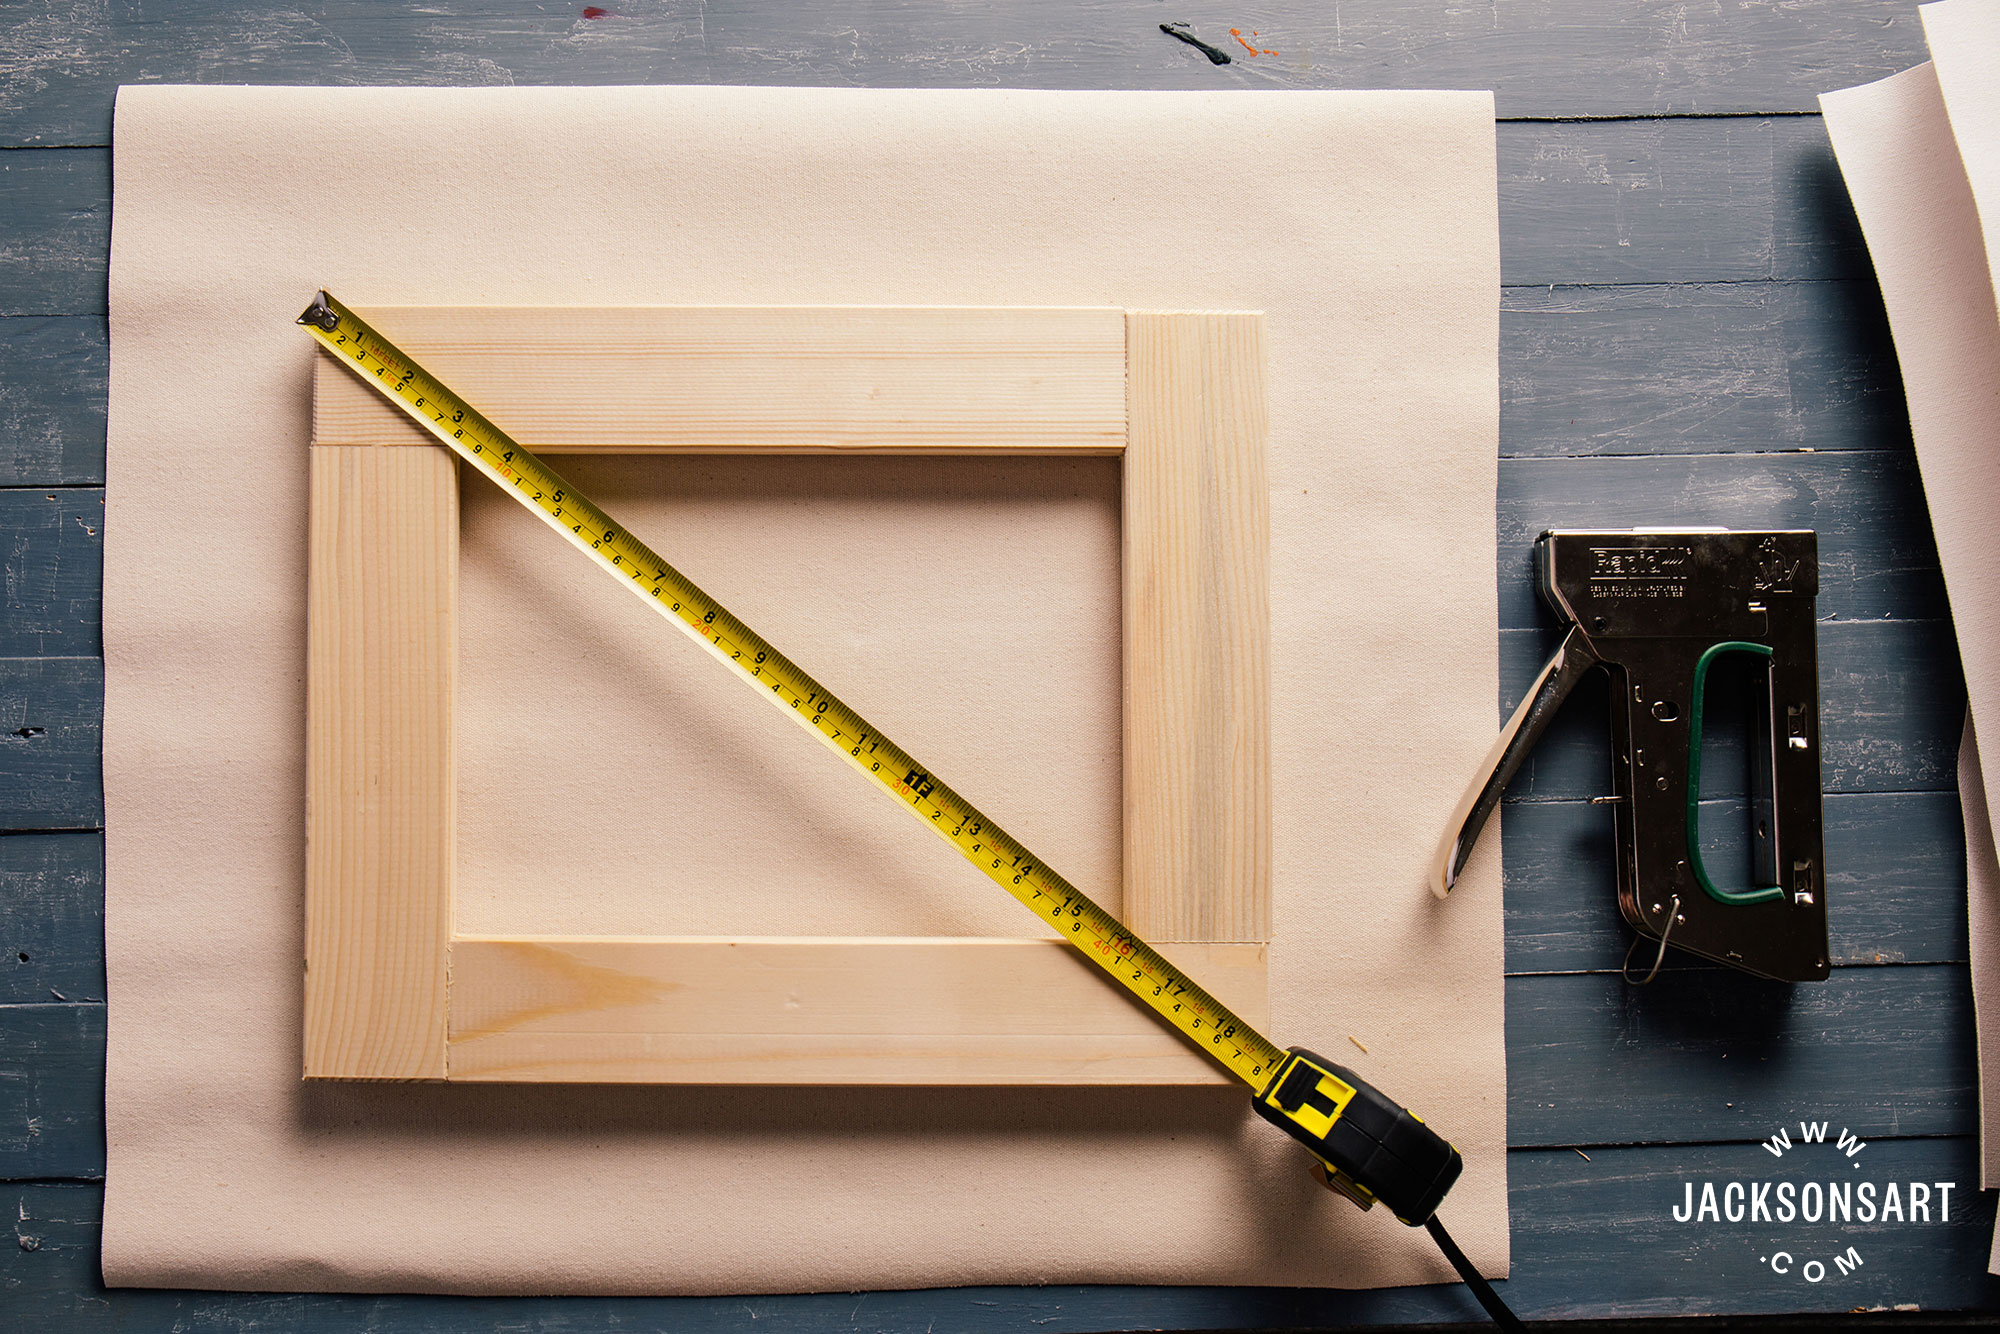
- Centre the prepared stretcher frame confront down (apartment side up) on the canvas piece, checking that the weave of the fabric is parallel to the stretcher confined.
- If it feels like you have bumped the frame out of alignment check the diagonals once more and suit if needed. For big canvases, information technology is best to build your stretcher frame and so lay it on the canvas slice earlier doing the final measuring diagonally and knocking it to adjust it to exist square. Because if yous do it before you lay information technology downwards information technology will movement a scrap. Knocking with a mallet often takes simply 1 blow on two opposing corners (not on the tip of the corner, but on the flat side of a corner, choose the i that needs to be pushed in) to move the measurement a cm or more. So remember that a tap does a lot at this betoken.
- Stretch and staple – the goal is even tension. Fold one side of the sail dorsum over the frame. Secure with a staple in the heart of the frame. You volition exist stretching from the centre and working your manner to the corners, always turning the frame or moving yourself around the flooring, alternating contrary sides and then the tension is even beyond all parts. Afterward the first staple, you will need to use the canvas pliers to grip the sheet edge (effort folding the sheet edge if you lot need a thicker fleck to grip) and rock the pliers to pull the canvas tight. The usual method is to work on the bar nearest yous and gripping the canvas edge with the pliers in an underhand grip, stone the pliers away from you to tug the canvas upwardly over the edge until you see all the wrinkles are out of the dorsum of the canvass and y'all see a sharp edge on the bar. Side by side put your finger on the canvas to hold it taut, drop the pliers and option up the staple gun with that hand and add a staple. The canvas doesn't spring back strongly and then your finger is plenty. If you lot don't accept canvas pliers the pulling can be done with your hands, it is just a chip hard on them. The offset staple on each side should be taut – if you plow the canvas over you should see a diamond pattern showing the tension.
- Work your way out from the centre, on reverse sides, back and forth until y'all are almost finished, nearing the corners. Insert the staples 5 to 20 cm apart, I tend to exercise 10 – 15cm between staples on big canvases and 5- 10cm on smaller ones. (The centre-cross-stretching method is a fourth dimension-honoured technique but there is also a method for stretching that traces the shape of the stretcher frame on the sheet and working to follow the weave stretches from the corners inward, rather than the middle outward. I have not tried this method simply information technology is supposed to give more than even tension.)
- If your canvas is not primed do not pull it very tight every bit the priming will wet the sail which causes it to shrink and the tension will either pull out the staples or bend the wood.
- If they are sticking upwardly at all you may wish to tap the staples in farther with a tack hammer. I go around the whole canvas when it is finished and tap all the staples. You tin't always see when they are not fully in.
- End stapling at least 10cm from the corner to give yourself room to manipulate the fabric for the corner fold.
- Note that unprimed linen tin can exist a bit fiddly to stretch until yous take had practice. It can be stretchy and yous may need to add some temporary staples in the corners at the beginning to go along the weave lined up and so remove them after you have progressed out from the centre.
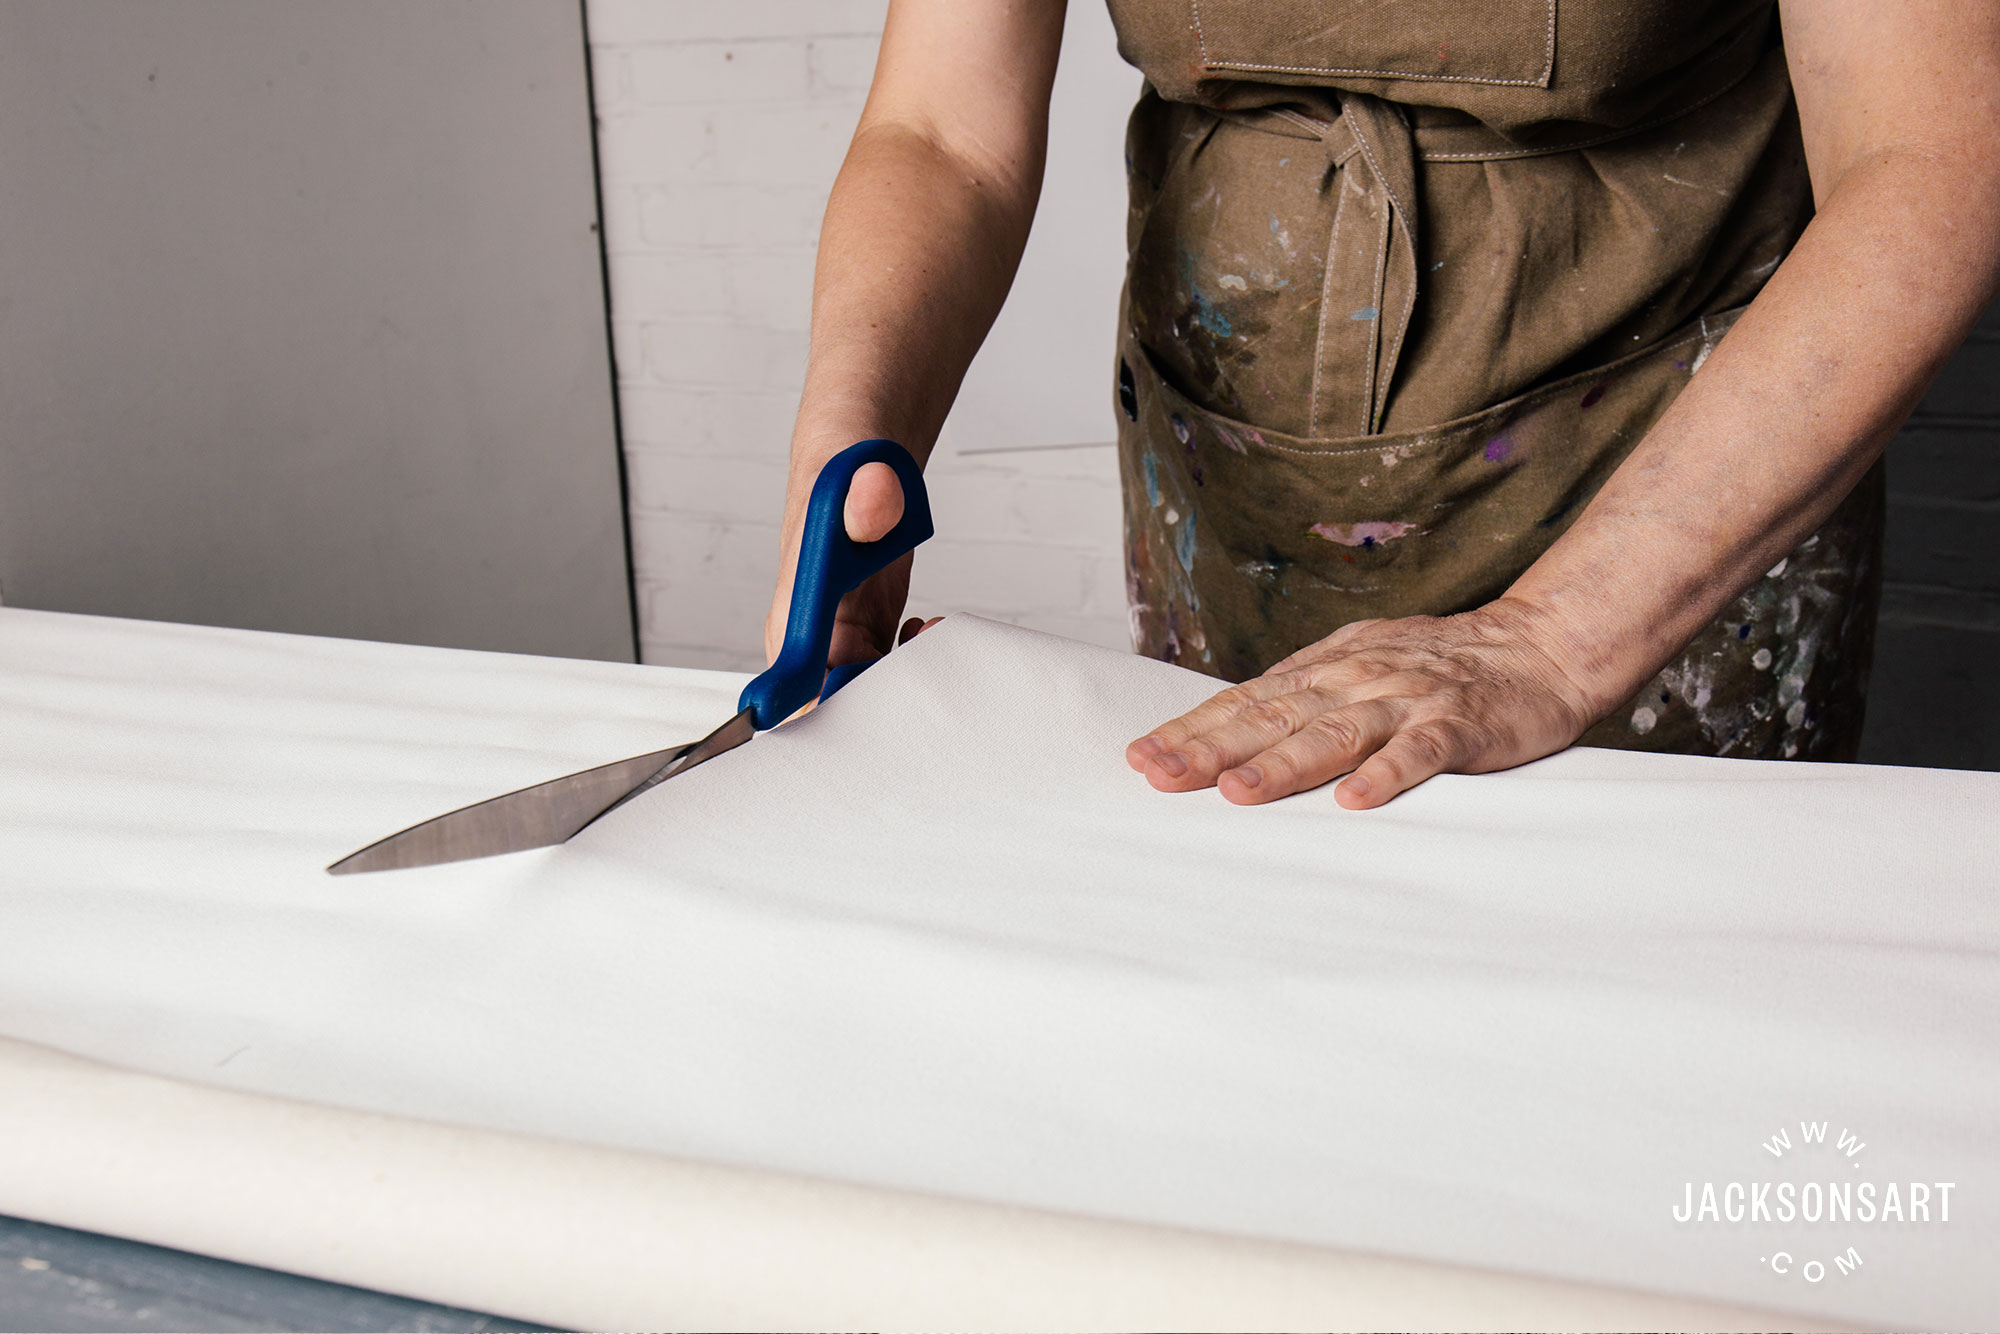
Big shears are cracking for cutting canvass.
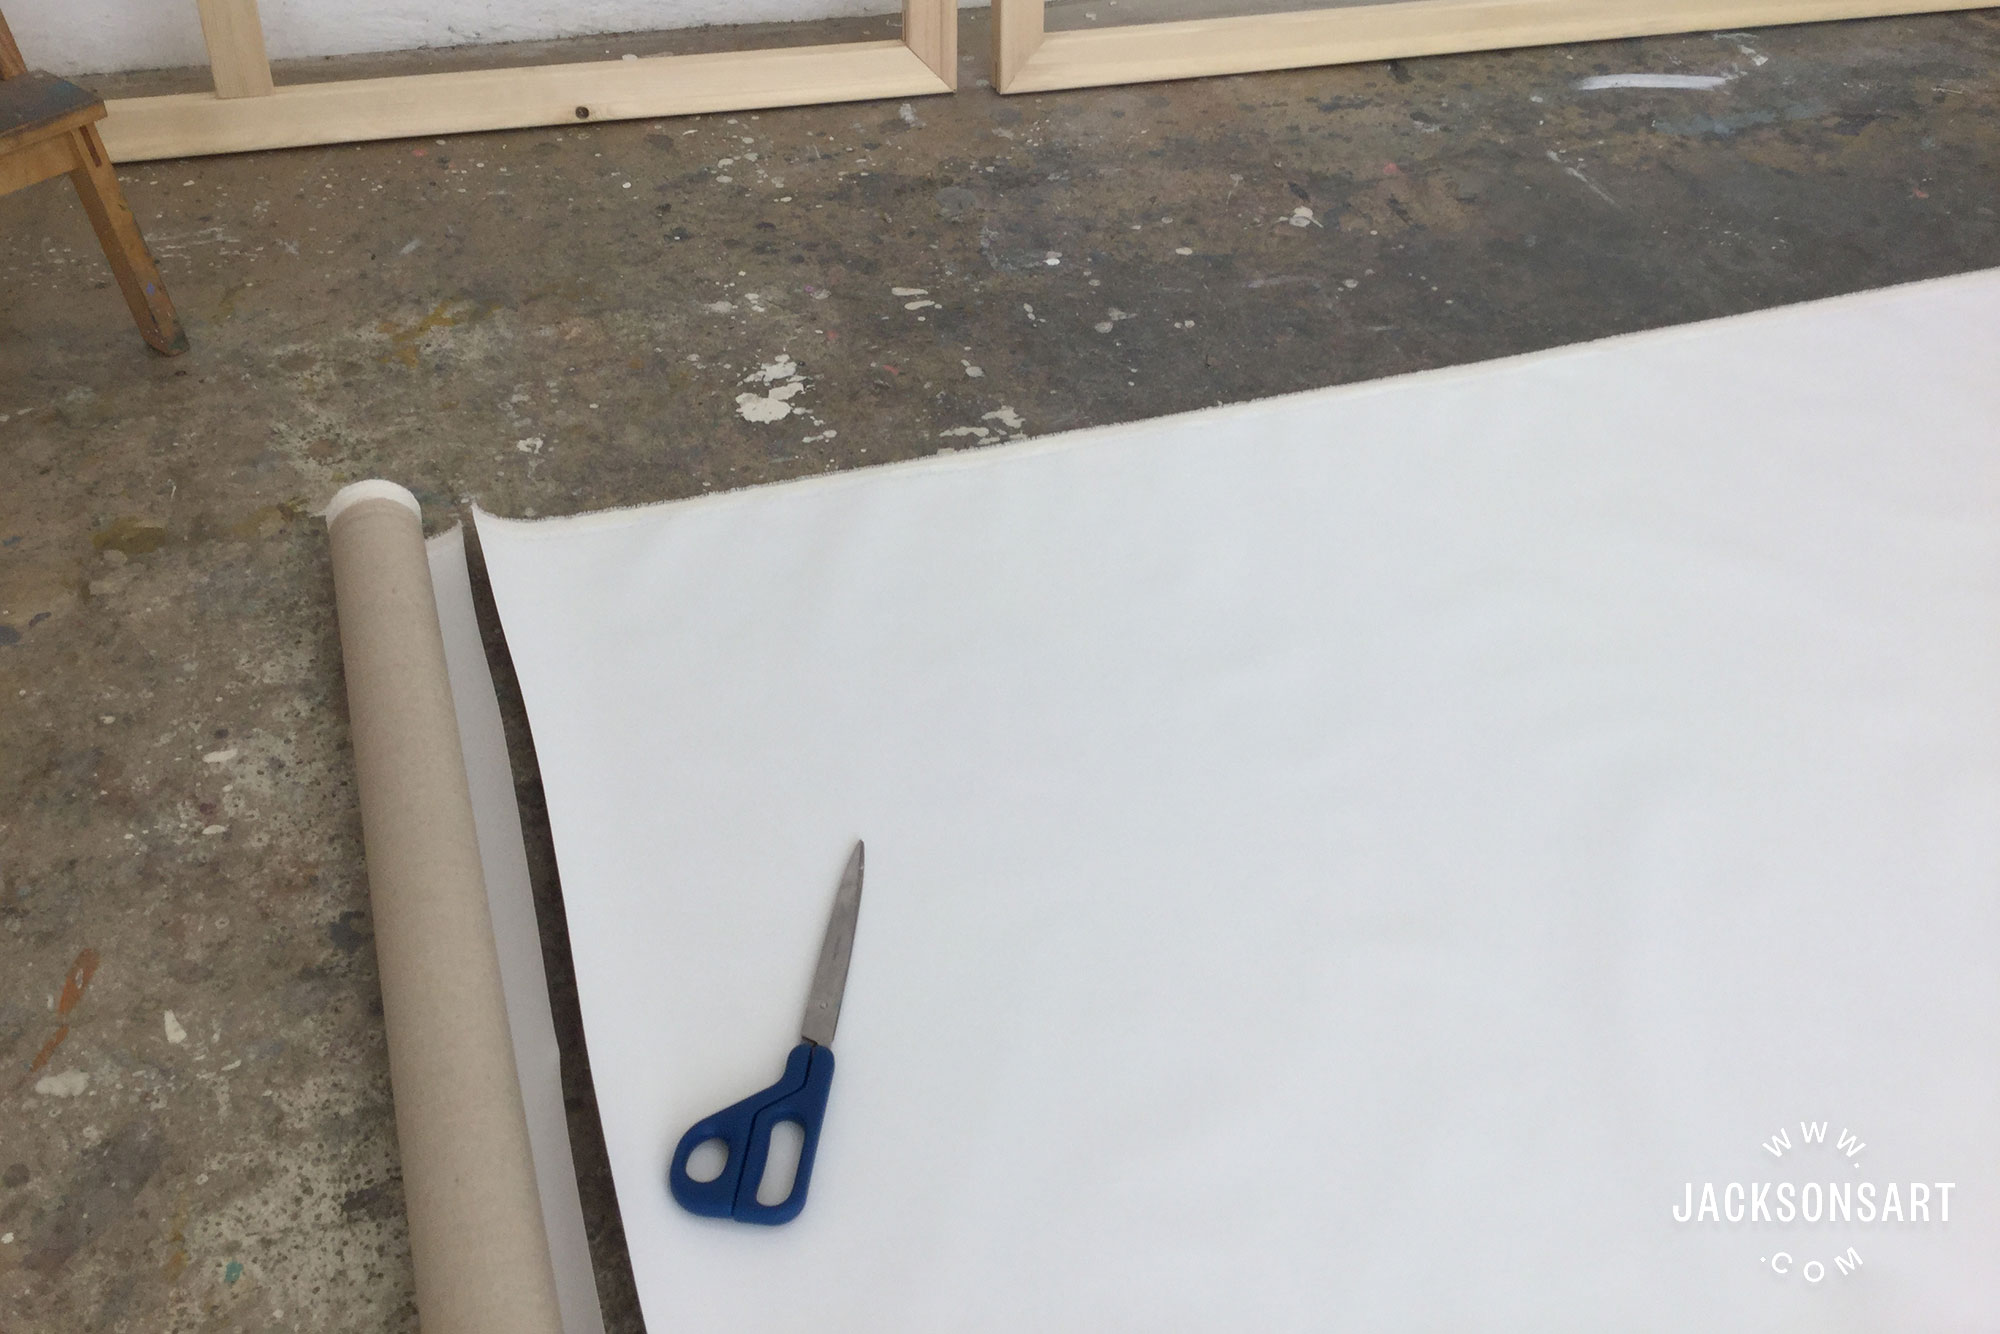
Large canvas may demand to be cut on the flooring.
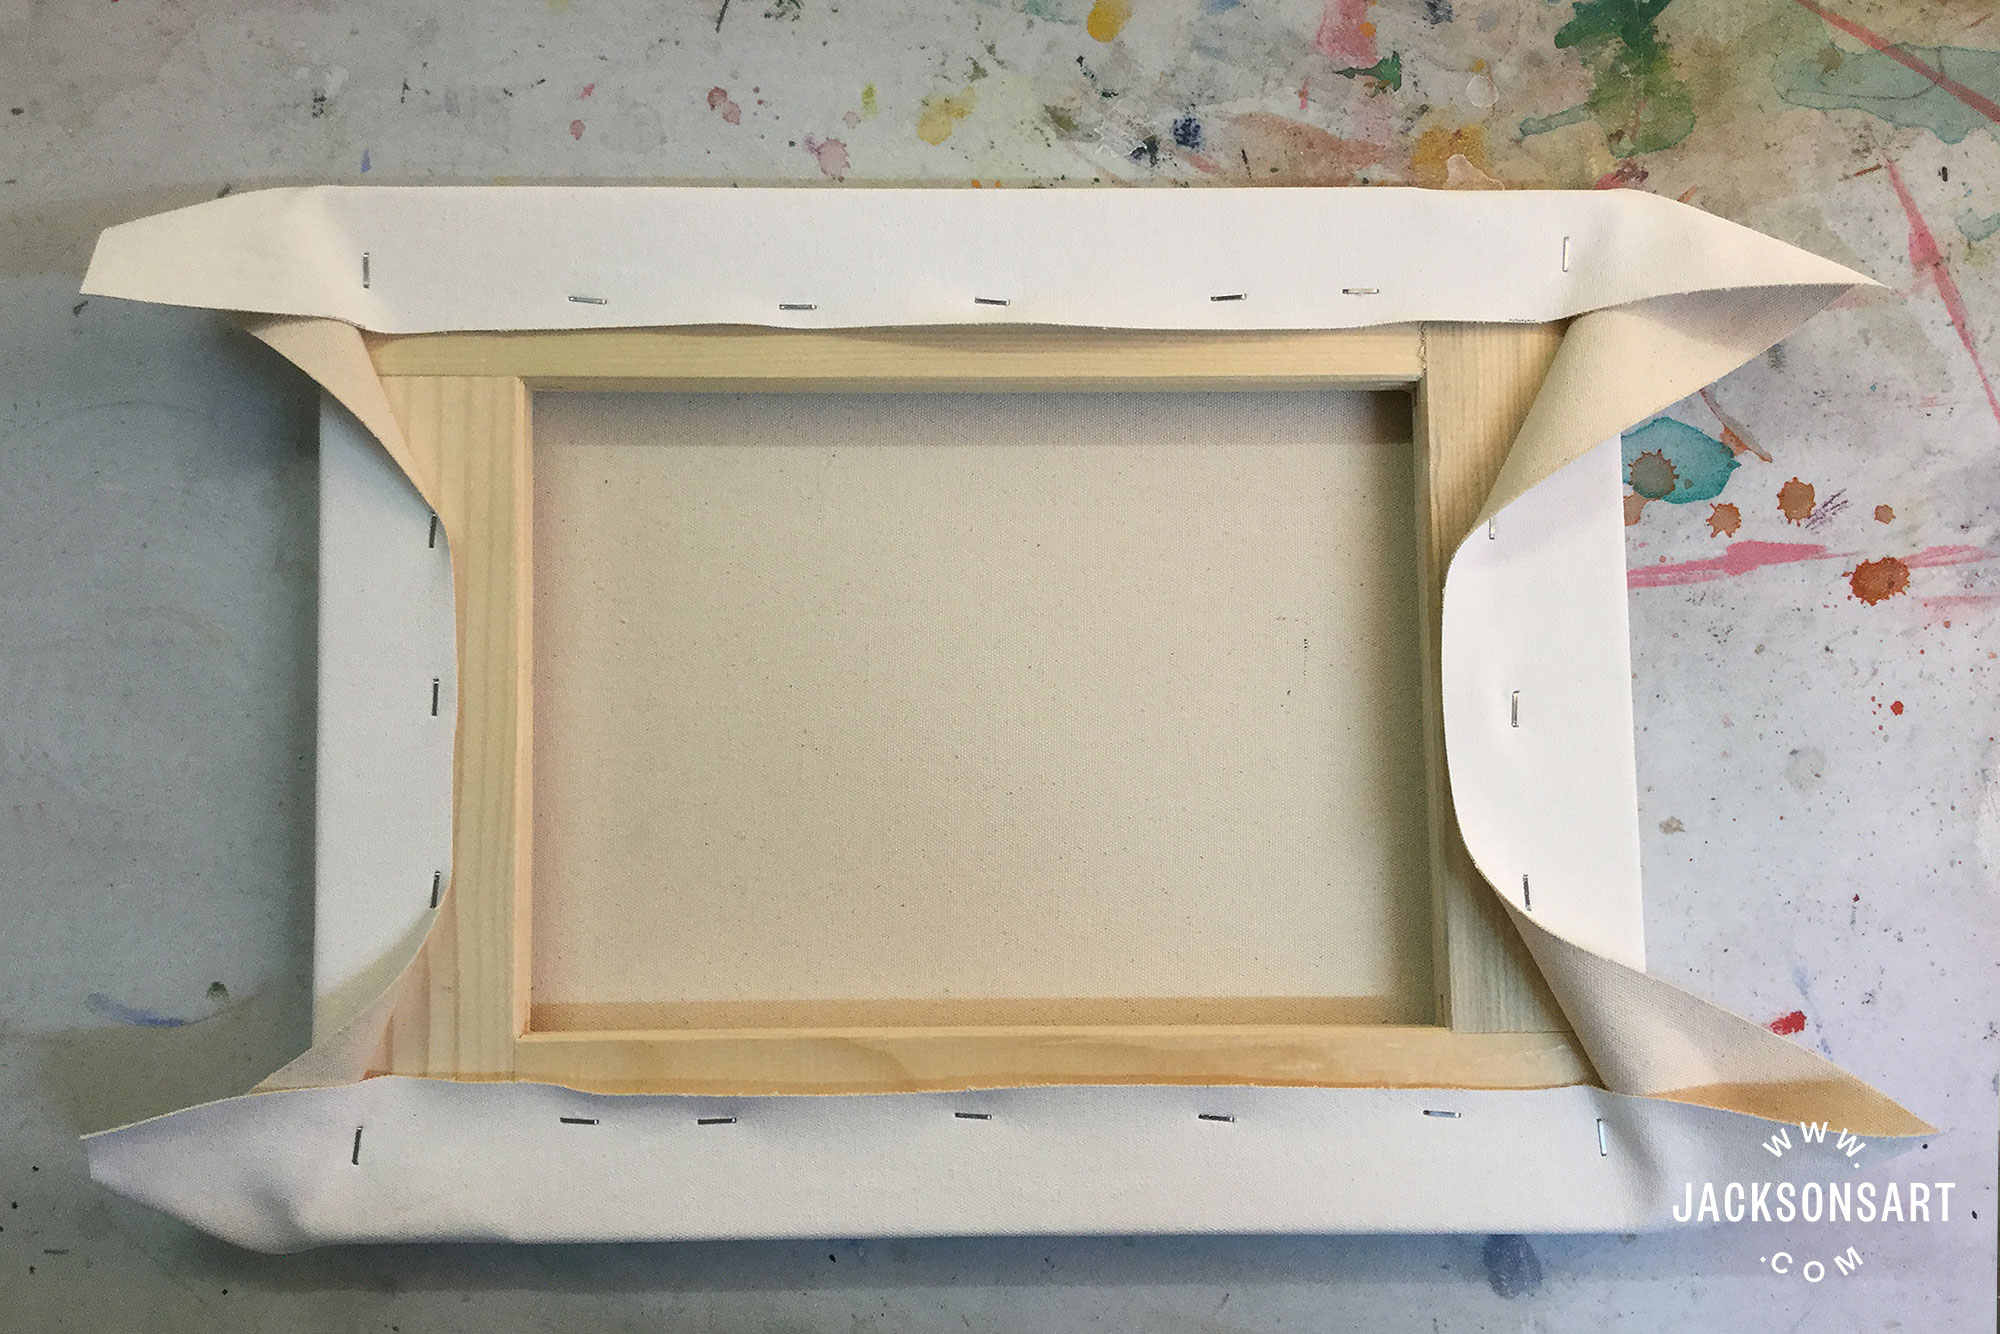
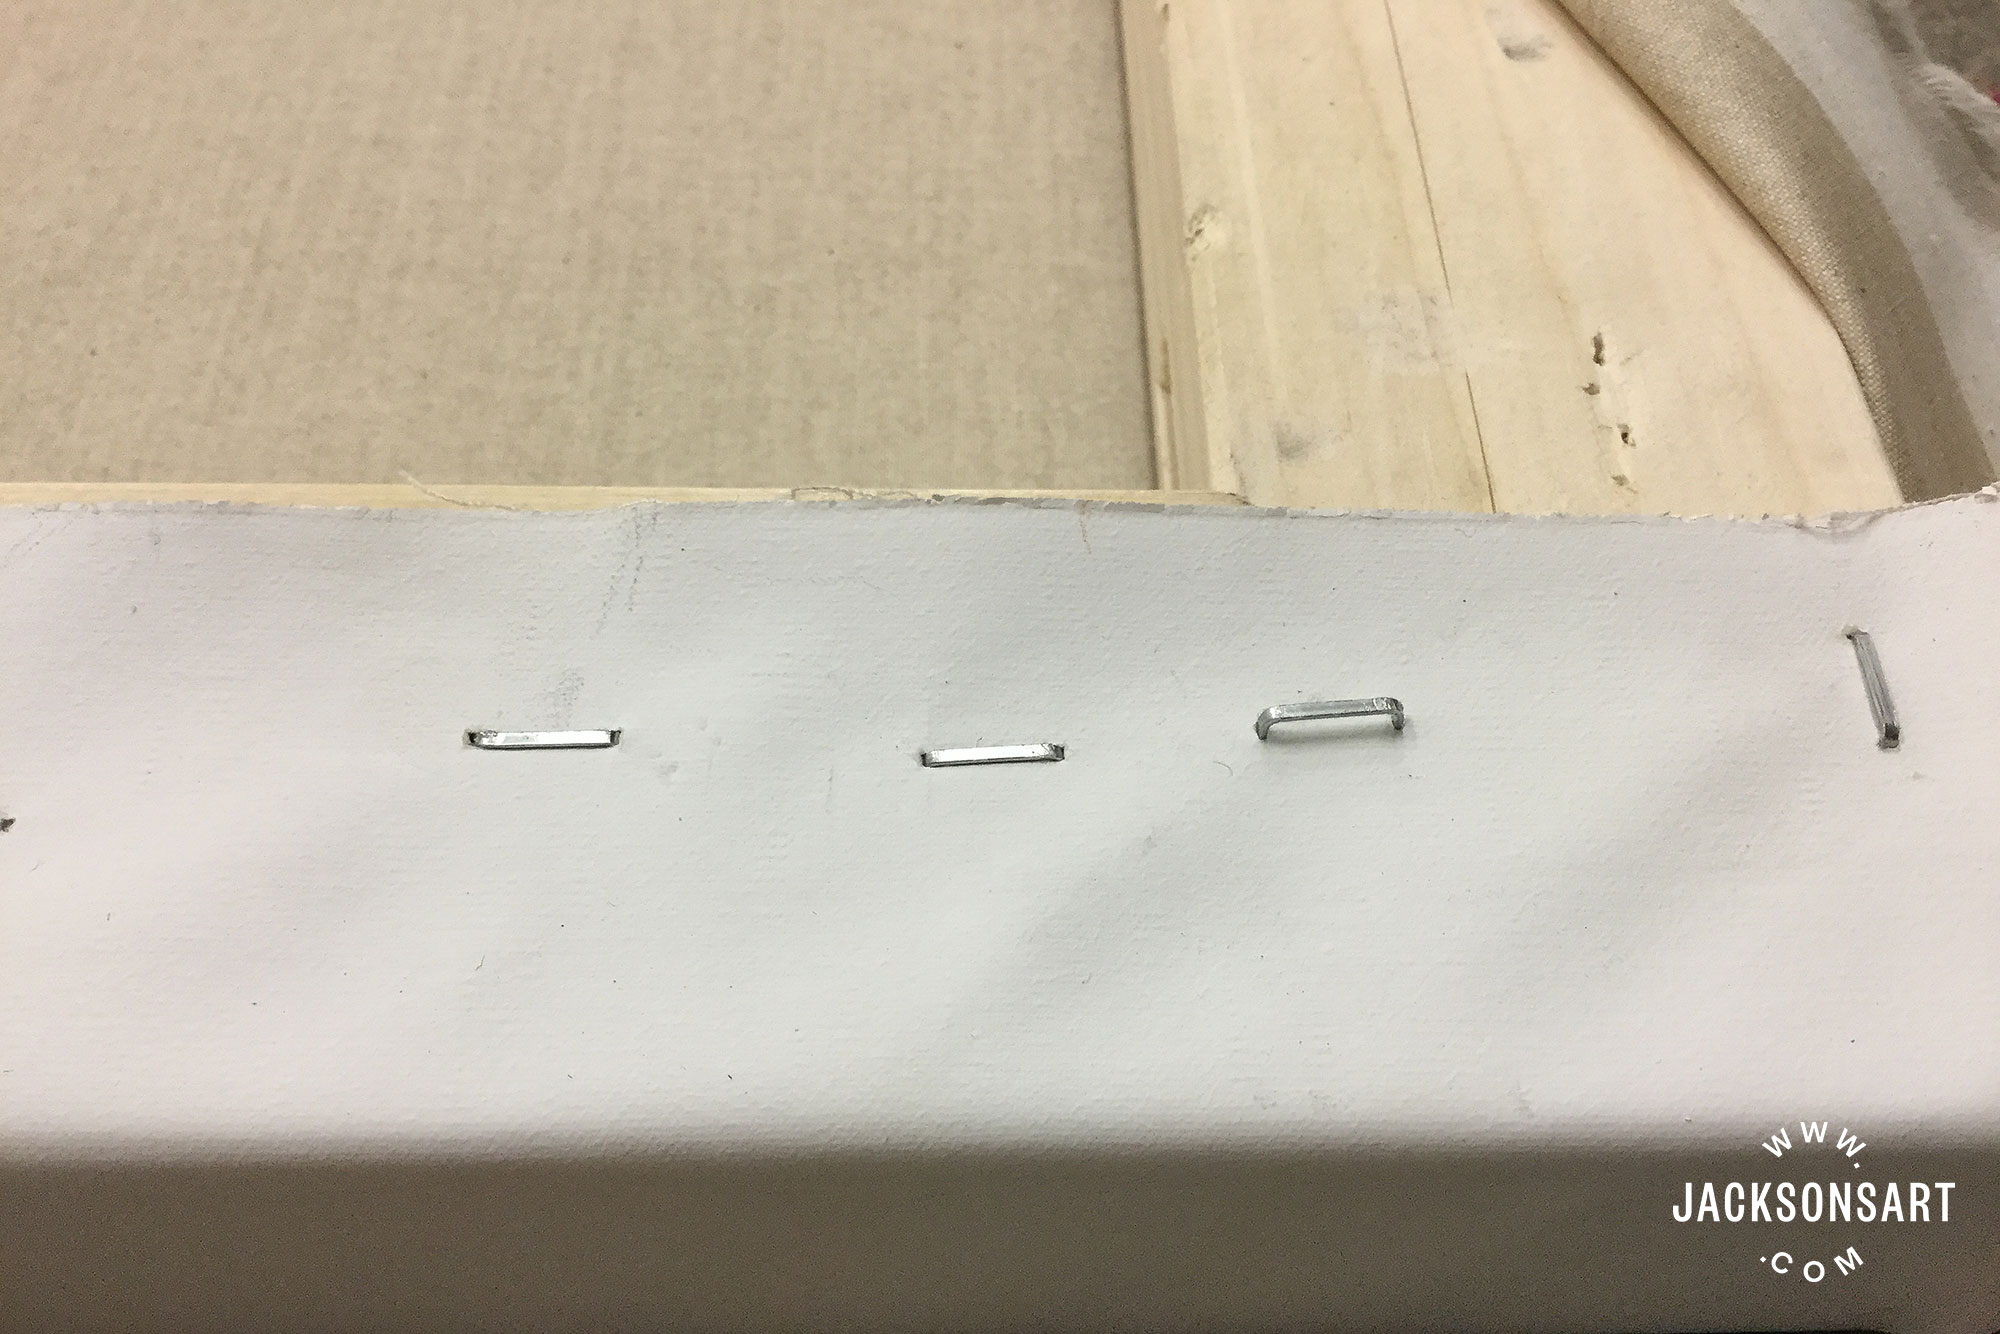
This shows the first four staples, i in the centre of each side. For a very big canvas I put iii near each other, using the maximum tension on the staple gun.

Notice the diamond pattern visible from the even tension caused past the offset 4 staples.

Y'all tin come across the diamond shape from the back on this large sail.
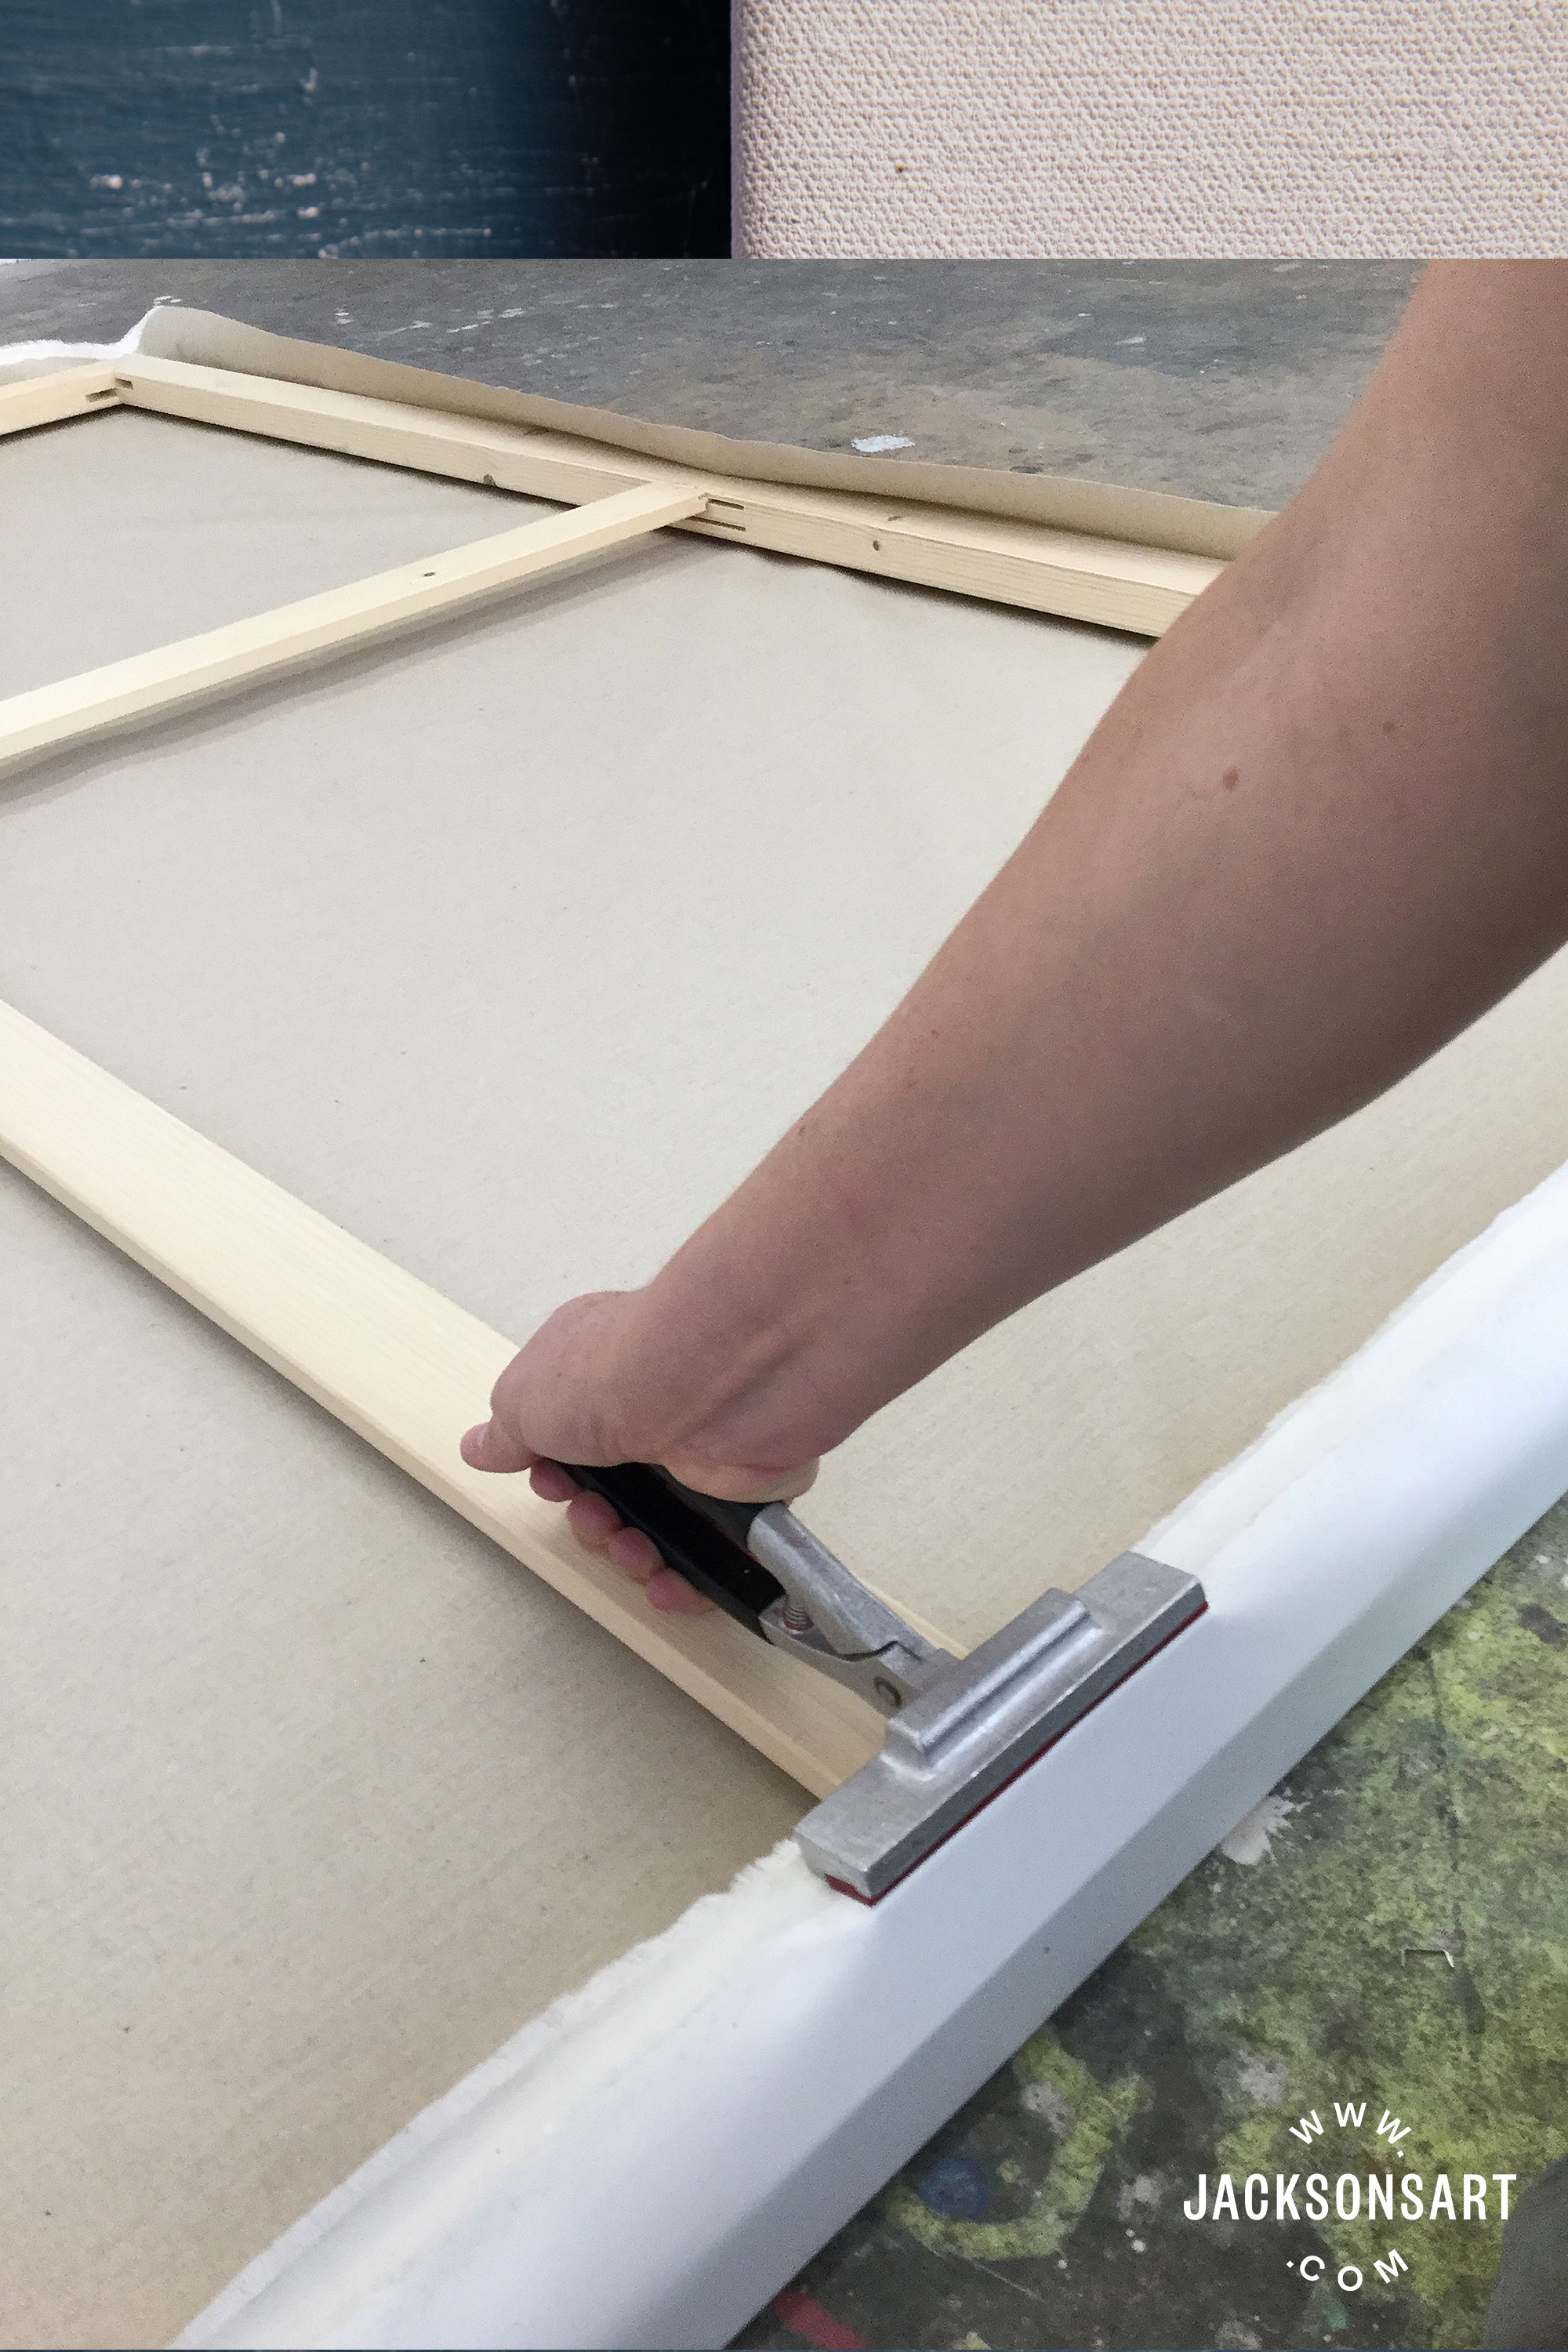
Grip with the pliers and rock abroad from yourself until you see the sheet in front end of the bar is smooth and the canvas on the side has a sharp edge.
You may need to fold up a piddling of the canvass to get a good grip or to go up to the edge.
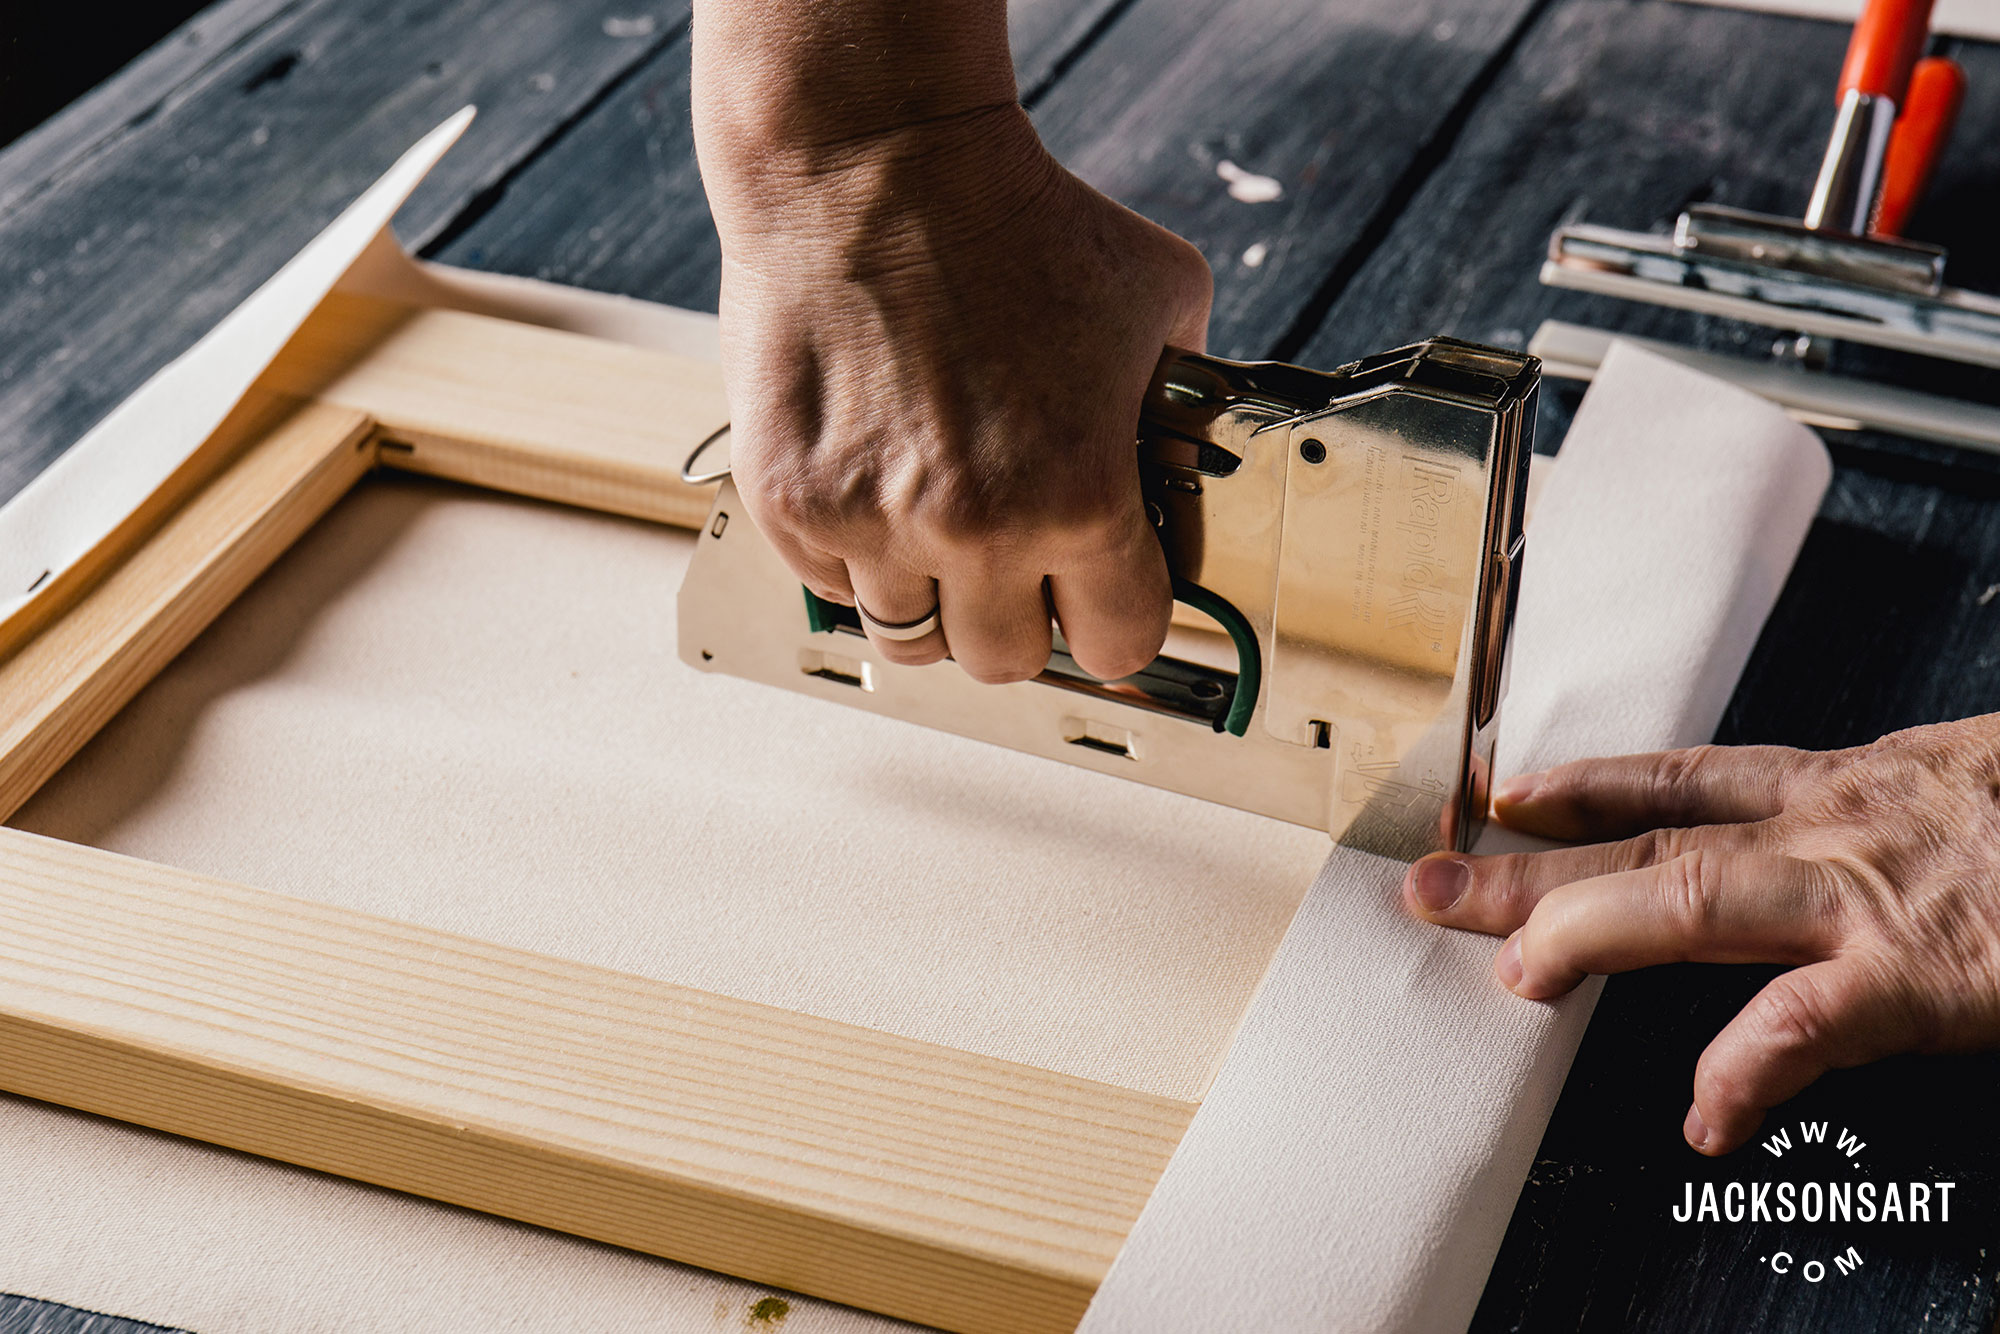
Put your other finger on the canvass, take away and drop the pliers and selection up the stapler with that hand. Staple in the heart of the bar, from the superlative or lesser whichever is more than comfortable.

Staple nigh to the corner, you will need some loose sheet to fold a corner.
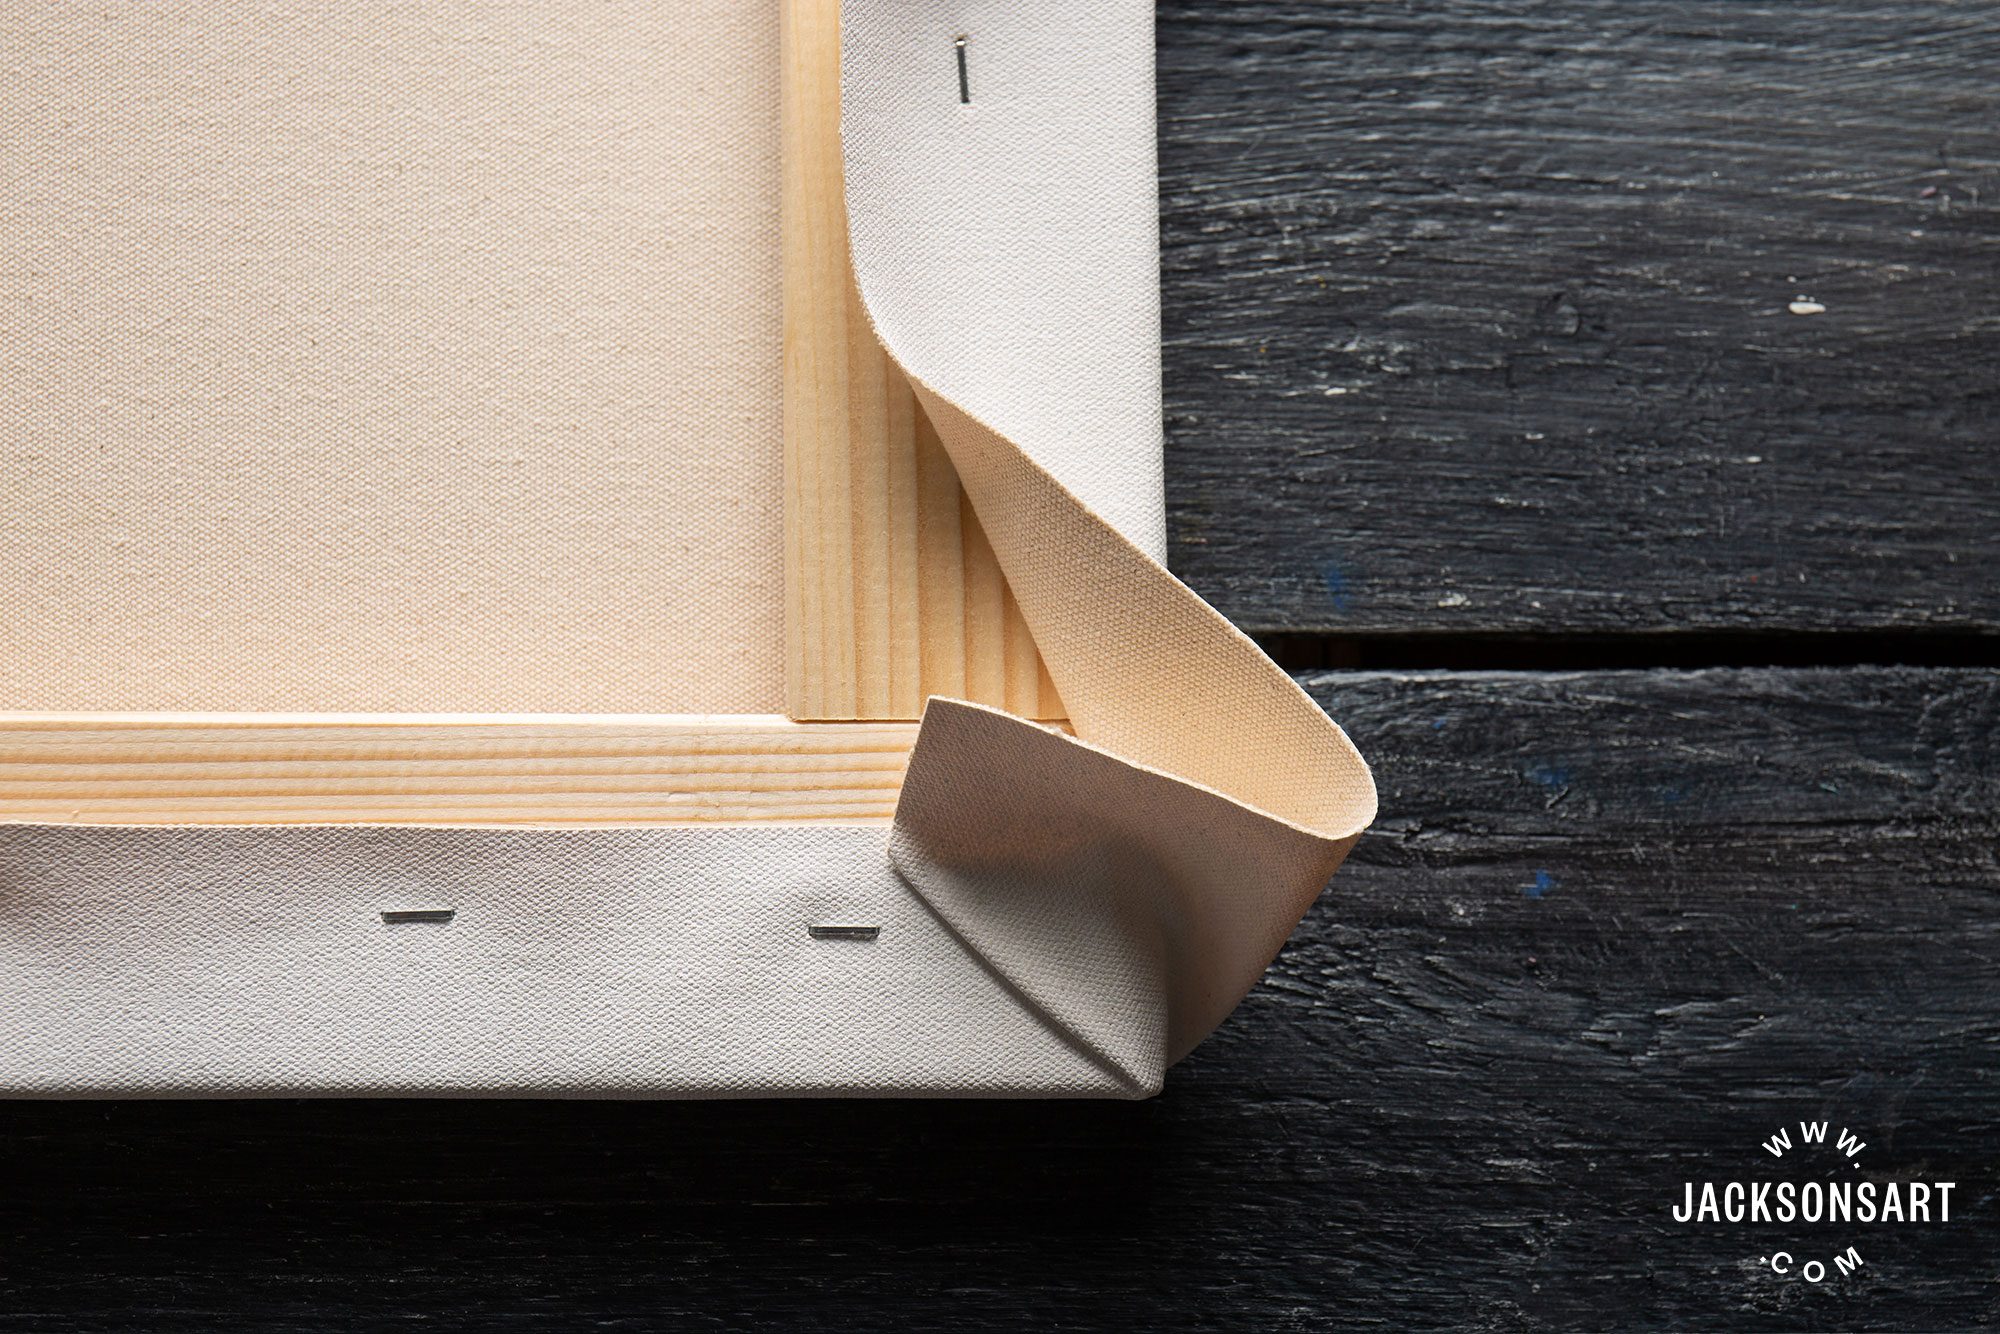
Folding the corners
The goal of folding a neat corner in the back is to create the flattest, smoothest lump on the dorsum and to control the location of the small fold crash-land on the side. Because the pocket-size fold bump shows slightly on the edge, if yous wish to you can ensure that it is on the top and bottom so that the sides are an unbroken line. And then if you lot know what orientation you lot will be using for the stretched canvas, you can cull which manner to pull over the fold.

The side bump yous volition get from folding the corner of a canvas. Yous can control which side it appears on, it is less visible if it is on the top and bottom edges of the canvas.
1. On the bars that volition be the side of the canvas (not the top or bottom) proceed stretching and stapling all the fashion to the corner with a last staple parallel to the top edge near the edge of the fabric, making your priority the smooth taut border of the canvas on the side bar. To keep track of which way you lot are folding the canvas I find it helpful to do step one on all four corners before you go back to finish the folds.
2. Still making the appearance of the visible side and corner the priority, pull the flap toward the middle of the sheet and create a triangular fold that falls but where a mitre join would in the corner of the forest frame – double bank check that the corner is smooth and not puckered. Press the fold with your fingers.
3. The final fold usually involves a scrap of wiggling, reaching under the fold and making sure all is tucked in smoothly and the corner is not loose or puckered – pull the last flap over and so that the side is parallel to the meridian bar, merely not showing over the edge. Staple downward the fold taking intendance not to staple across the corner join in the stretcher frame. Stapling over the join in the frame would mean that you couldn't use the wedges to expand the corners afterward.
This sheet is intended to exist used in a portrait orientation., and then the long side will be most visible. To make sure the sides are an unbroken line I will fold the canvas to the summit and bottom. So I have taken the staples on the long side all the way to the end and put a final staple along the far edge.

Making the smooth side of the sail your priority, fold a mitre corner and and then fold the rest of the canvas flat over that.
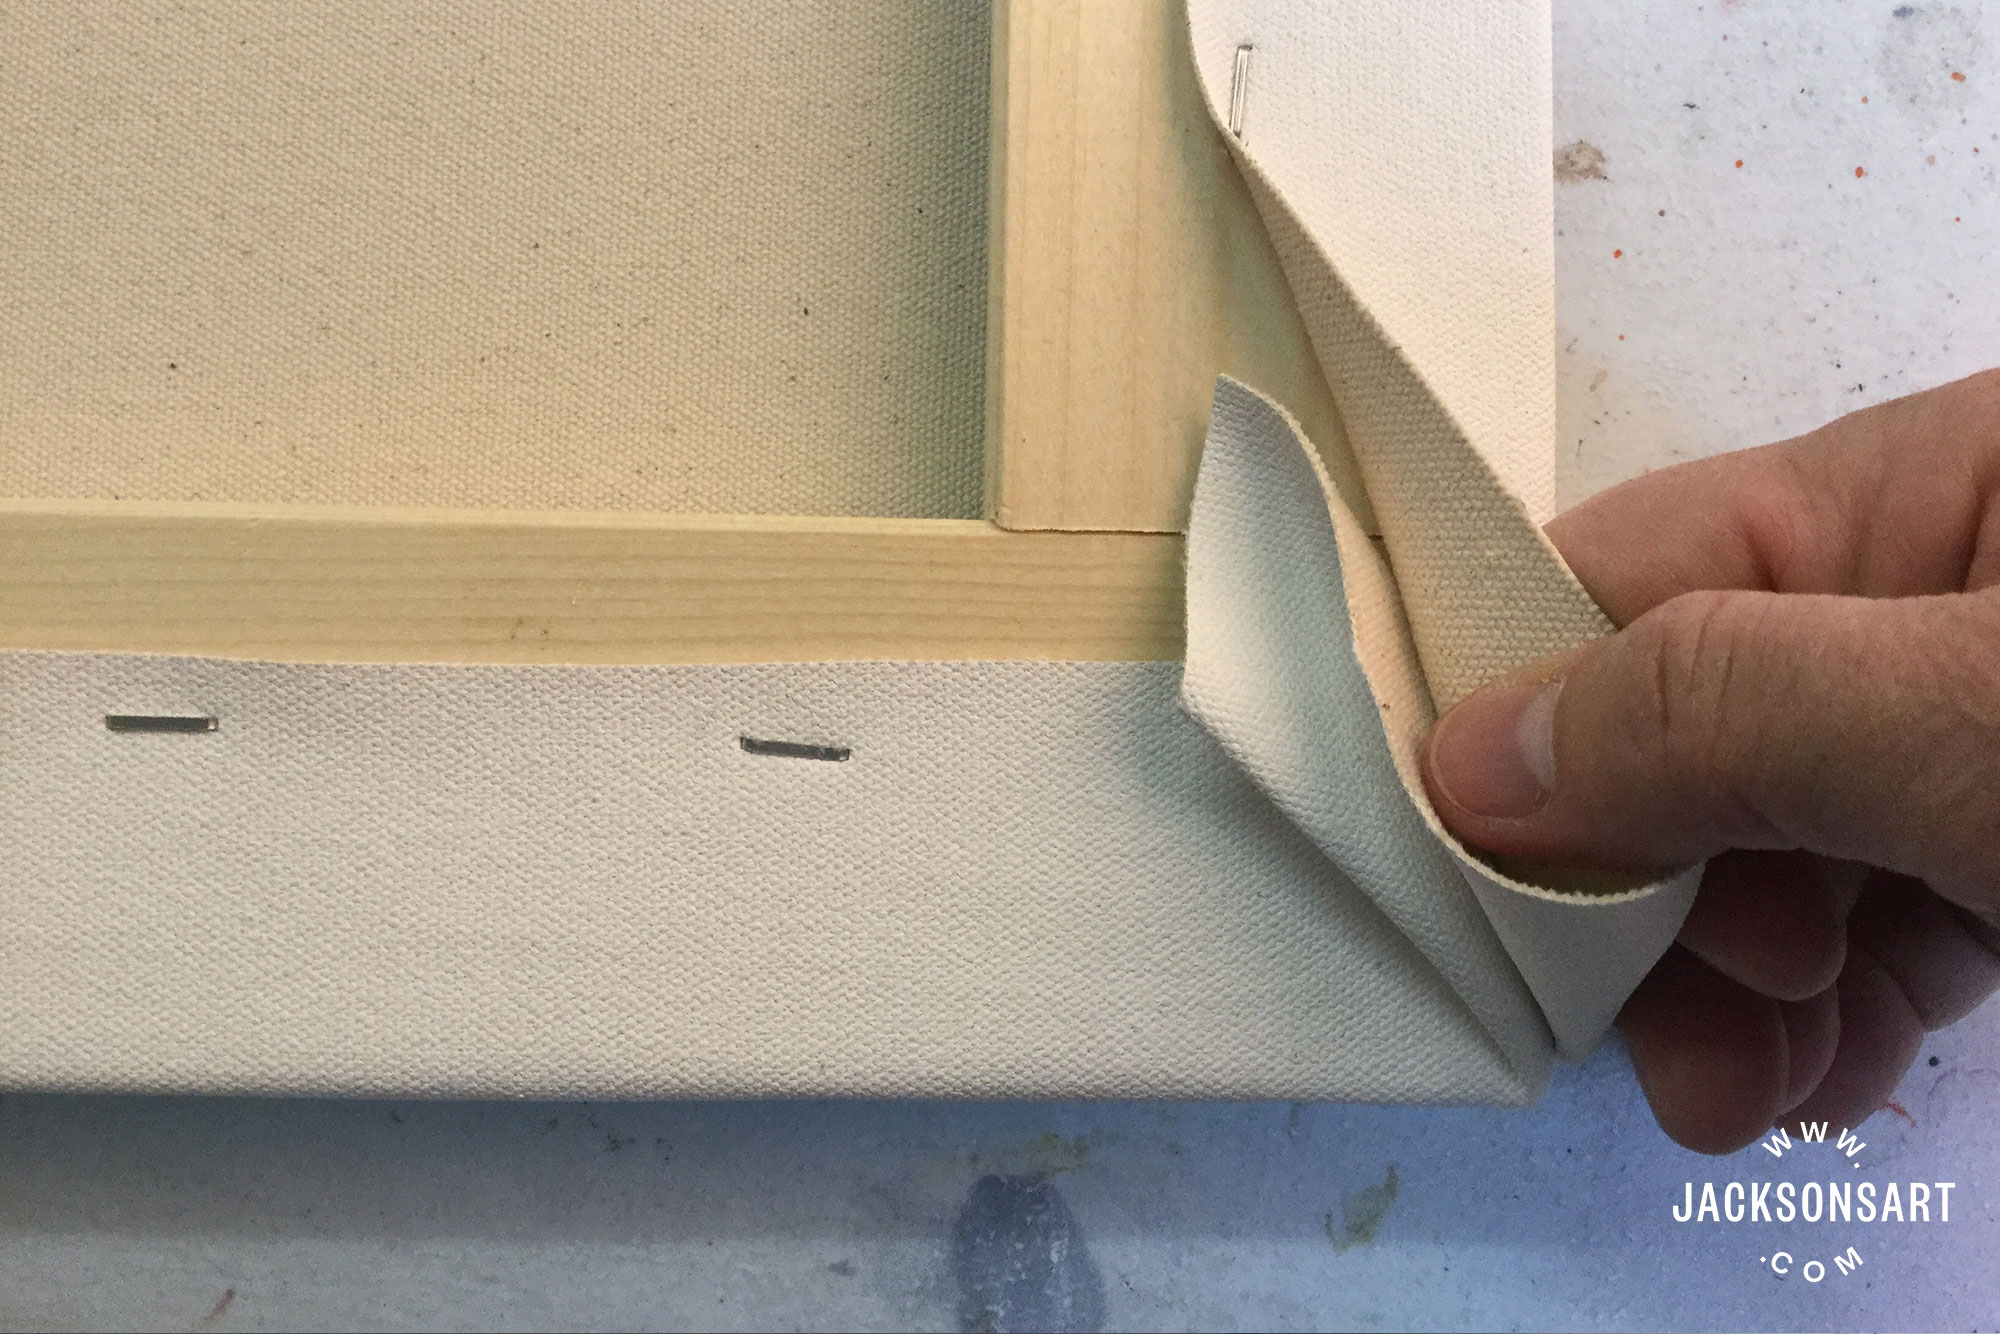
The fold almost finished.
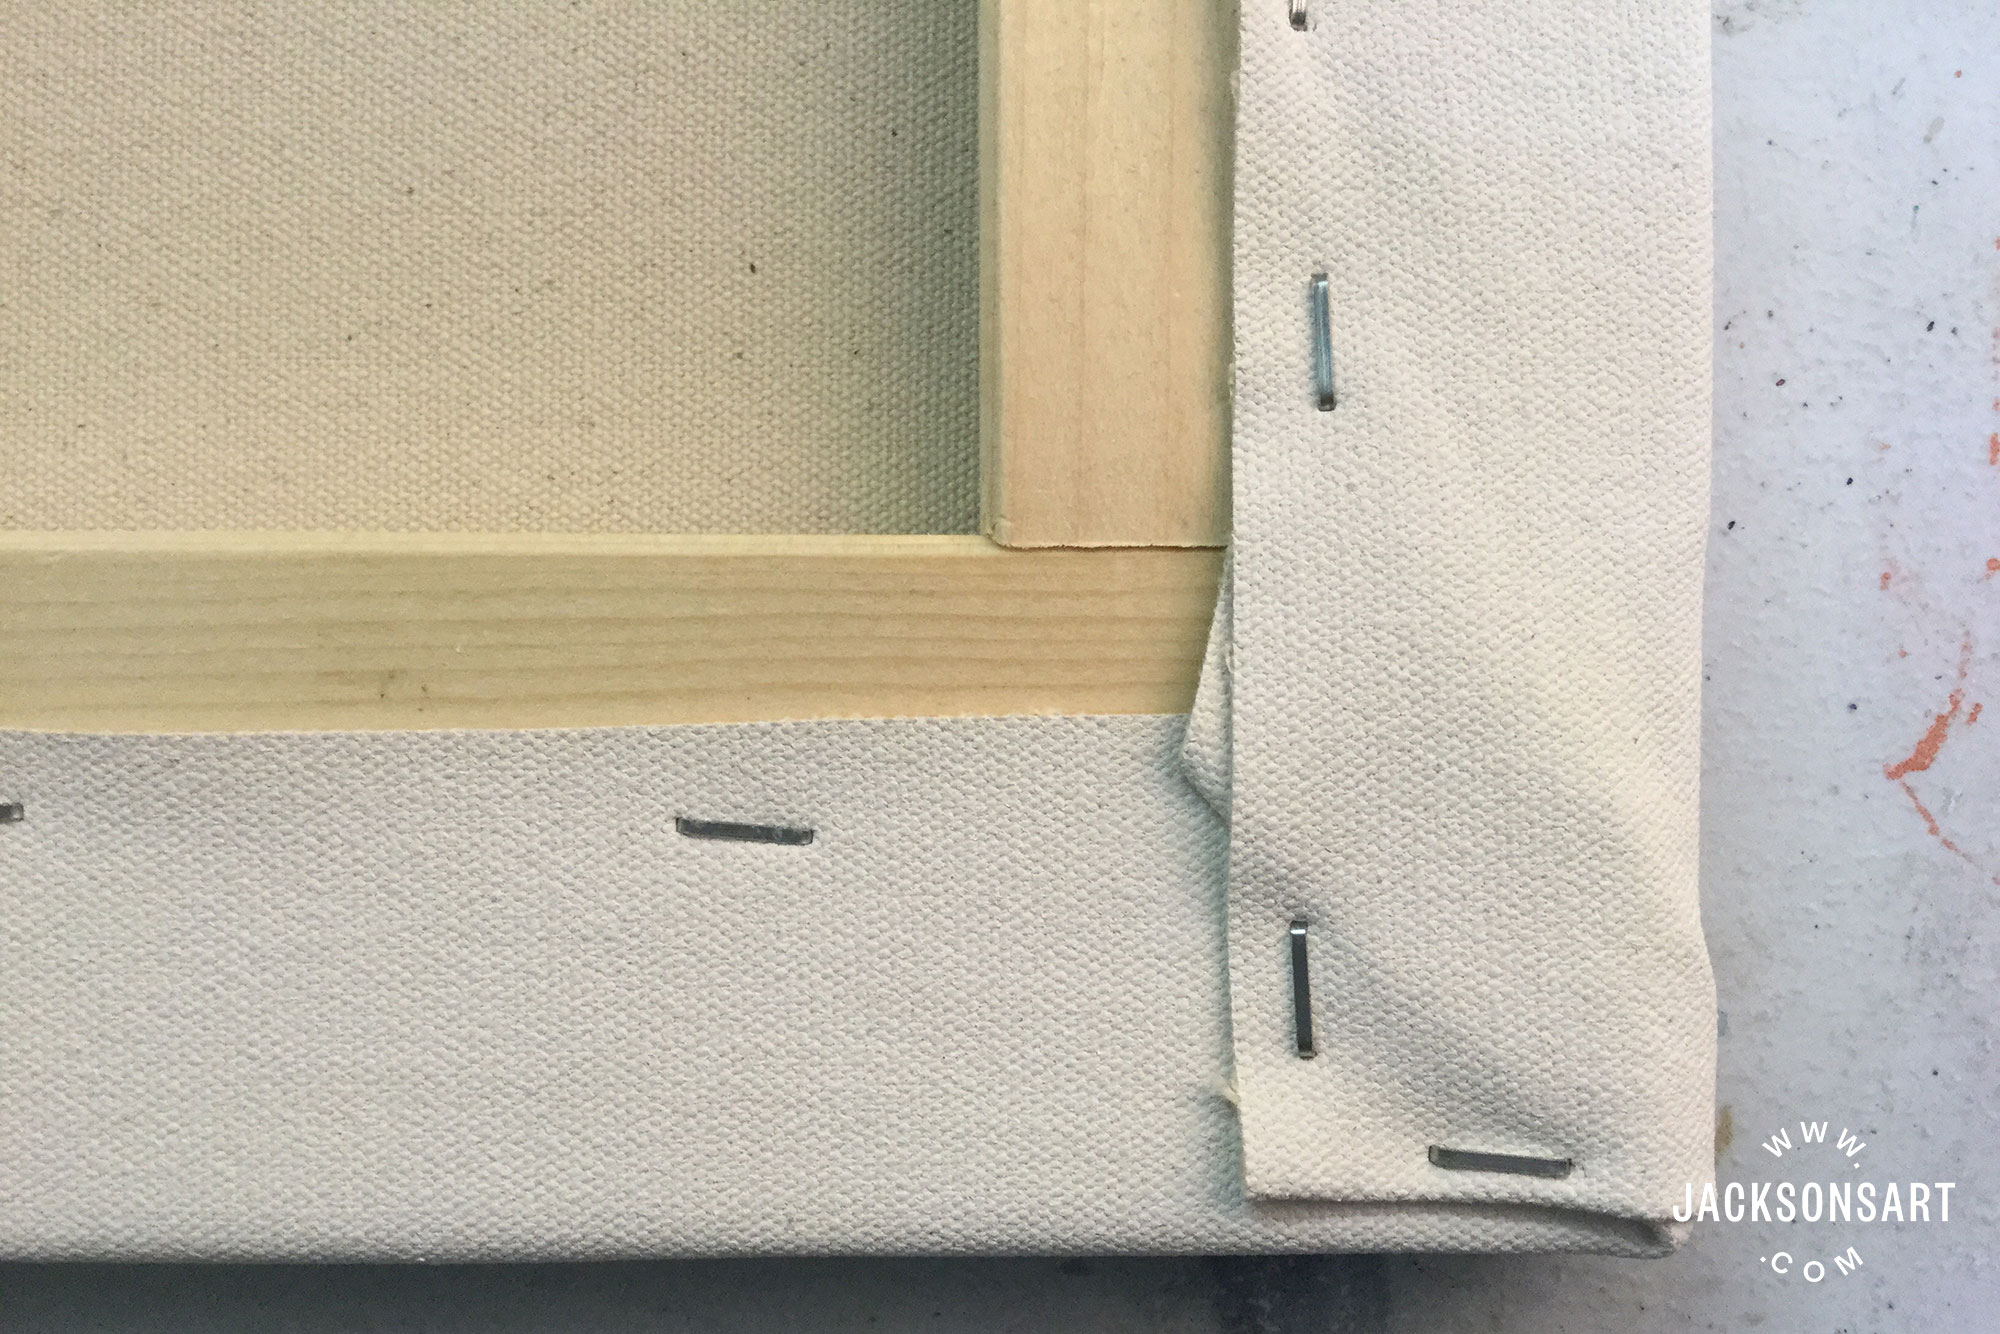
The corner finished and tidy. It is neat and nearly apartment. Detect the line in the wood that is the join of the two confined. You lot volition want the option of spreading that a bit with wedges if needed and then always be aware of where those are and do non staple beyond them.
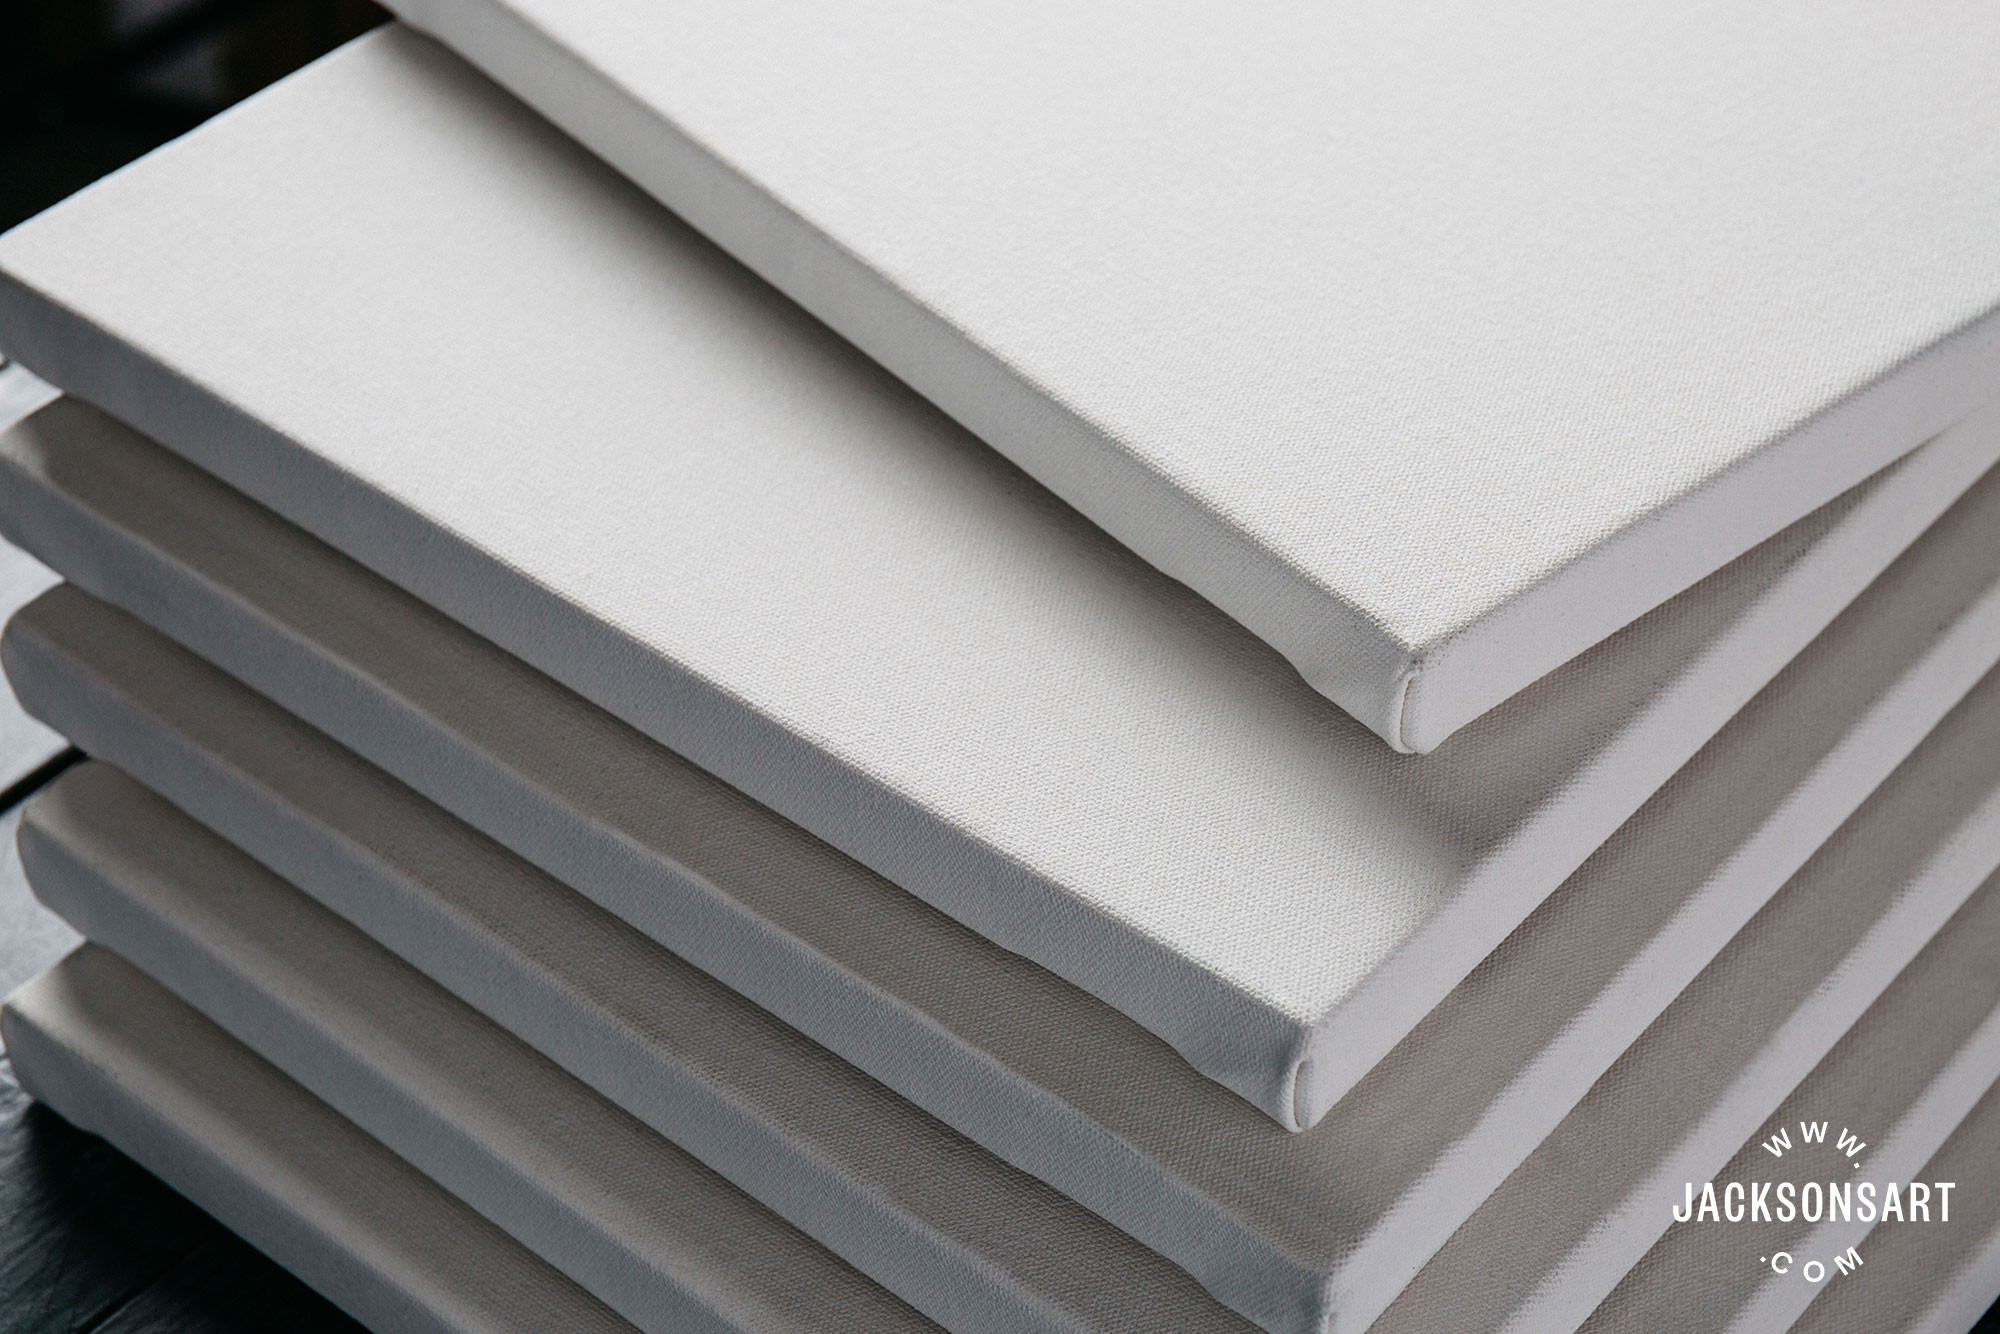
Appraise the results
Inspect your stretched sail. It should non have wavy lines in the weave or take wrinkles or sags. Y'all should not exist able to easily push it from the front to touch the cross bars. If it looks as if a part is under more tension or less tension than y'all'd like simply remove a few staples to loosen an area or get a grip with your pliers to tighten it, and then restaple the area. The staple lifter is helpful here.
- Turn the canvas over and see if you accept whatsoever slack areas and remove staples and re-stretch them until it is all evenly taut.
- Y'all may wish to trim any excess canvas or fold the extra cloth under and staple again, simply some artists just leave it because generous canvas margins provide piece of work edges for when the canvas needs re-stretching or conservation in the future. Never cut away textile at the corners. For a very smashing reverse side, you tin can tuck under the extra fabric and make a 2nd row of staples to hold information technology in identify.
- Tap in corner wedges to expand the corners to complete the tension.
- Tap in centre bar wedges if needed.
- Using a spray bottle, mist the back of the canvas with water for a bit more tightening, if needed
A final borer around the whole canvass to ensure each staple is well seated, is a good practice.
Troubleshooting
There are really just a few things that can go wrong when stretching a canvas and they can all be solved by re-stretching the sheet.
- Loose or sagging canvass (not tight enough stretching of the canvas)
- Wavy areas of sheet (uneven tension of the canvas)
- Warping of the stretcher bars, and so that the whole canvass doesn't lay flat confronting the wall (uneven tension or confined not strong enough for the amount of tension)
- Angle of the crossbars then they are not apartment confronting the wall, just curve to protrude out of the back (besides tight tension, usually from overstretching unprimed canvas that then shrinks when it is primed).
Stretching your own canvas gives you lot control over all the aspects of your painting surface including the overall size; the depth; the absorbency, the colour and texture of the primer; the texture/grain and weight of the canvas and more than. When you know the detail qualities you want for your painting surface, stretching your own ways you lot don't accept to settle for a sheet that isn't quite correct, you tin meet your exact specifications. The finished production is also of a superior quality, with heavier bars and better canvas than virtually ready-made canvases. The procedure is non difficult and is quite straightforward – it takes longer to explain it than to do information technology!
When preparing surfaces in the studio it is often most efficient to practise a batch, unless you are preparing one very large support. The size of the batch will be adamant past both the space available – peradventure to lay out canvases while primer is drying – and how many steps yous tin can practise in the allotted time you have – perhaps you lot will build six stretcher frames and cut out the canvas ane twenty-four hours and stretch the six canvases the next day and over another mean solar day or 2 prime number and sand them. Using primed canvas saves a lot of work and y'all don't need every bit much infinite for drying but y'all may not get the precise surface you wish. Of course, you can always use primed canvas and add a topcoat of your preferred ground. This could even be an absorbent watercolour footing, if you wish to paint with watercolour on canvas rather than paper.
Priming the canvas
If you have used primed canvas yous can begin painting straight away or you lot can add additional priming to the surface to give a item surface quality to your sheet such equally an oil primer, an absorbent ground, a rough surface such as a pastel ground, a few more coats of acrylic primer and so that it is whiter, a not-absorbent primer so the surface is slicker, likewise as other primers. If you accept stretched un-primed canvas you can outset painting directly abroad in acrylic simply the surface volition repel water somewhat and if y'all intend to stain the bare canvass yous will probably wish to add together a flow release agent (diluted according to the instructions on the bundle).
If you wish to pigment with oil on blank canvas be aware that it volition not last forever as drying oils (all oils used to make oil pigment) volition slowly eat the fabric. Y'all will also get a band of brown oil in a halo around the colour which some artists discover cruddy. This leeching of the oil out of the paint also ways there is less binder in the colour and it may look chalky and even crumble off. For a sound structure for oil pigment, it is recommended to seal the canvas from the paint. This ways a size (traditionally rabbit peel glue) and a footing (traditionally chalk gesso). The modern alternative is acrylic primer/gesso that acts as both a size and ground. Apply many thin layers until yous tin can no longer come across lite through the weave if you hold the canvas up to the light. Your first layers should be thinned with h2o and scrubbed into the weave in circular motions. Each successive layer should be practical lightly to prevent cracking and to reduce brush marks – add less water to each layer and use as niggling primer as possible to cover the whole surface, make it a light coat like you are dry-brush painting. Each successive layer should be practical in the opposite direction to the terminal. Let it become affect-dry out between coats, some artists sand each coat if they want a smooth surface. Each make of primer has a different ratio of acrylic binder, chalk and white pigment – so some are more absorptive and some are more opaque – try a few until you lot find the 1 that suits your way of painting.
As an extra step in special circumstances (for acrylic painting that uses transparent layers with about no colour and lots of water which could draw some small-scale corporeality of colour from the wood bars or sheet) you may want to apply i coat of gloss acrylic medium before you lot employ the primer to seal the canvass from any corporeality of surface-induced discolouration (SID), which might show discolouration in paint which has little pigment in it.
Read more about priming in our blog article – Don't Be a Square – Preparing Circular Painting Panels.
A canvas just equally yous wanted it
Now that you have made the perfect canvass you may wish to write on the back forth the staples, with a pencil or Sharpie marker, which canvas and primer it is and then that when you realise you loved painting on this surface you will know what you lot used and then you can make it again!
The process is non complicated, it is just a few steps and in one case you know the principles it is quite straightforward. If you are not sure if it is something yous want to endeavor, just remember that the worst result is a loose canvas which is not the finish of the earth. You can always remove some staples and right it and you should become good at stretching quickly.
Canvass on a Panel
If yous like painting on canvass but do non like the bounce y'all go with a stretched sheet, yous can adhere your favourite primed or un-primed canvas to a wooden panel to paint on a rigid surface that withal has the texture of canvas. The Jackson's Smooth Plywood Panels are great for this.
Read more in our canvas blog article – Making a Canvas Painting Panel.
Footnote from 2nd paragraph: *Aureate Ratio
The proportions of the Golden Ratio (also chosen Golden Department or Golden Rectangle) create a shape that is considered most aesthetically pleasing throughout western art history. The long sides of the rectangle are 1.618 of the short sides.
jacobsonthelikin93.blogspot.com
Source: https://www.jacksonsart.com/blog/2019/04/30/how-to-stretch-canvas-a-visual-guide/
0 Response to "What Can Be Used for Warped Canvas Art to Make Flush Against Wall"
Postar um comentário